Configure Fusion Applications Audit and Security Logs Ingestion in OCI Log Analytics
Configure Fusion Applications Audit and Security Logs Ingestion in OCI Log Analytics
Introduction
Oracle Fusion Applications generate extensive audit logs that capture every significant security and business event across your SaaS environment. These logs include user authentication events, authorization decisions, administrative changes, transaction-level activities, and platform-level operations. For organizations running Fusion Applications across multiple modules (ERP, HCM, SCM, CX, EPM), centralizing these audit logs in OCI Log Analytics enables:
OCI Log Analytics provides the ideal destination for Fusion Applications audit data, offering powerful exploration capabilities, correlation with other log sources, detection rules, and AI-powered analysis through LoganAI. By leveraging the REST API-based log collection method with OCI Management Agents, organizations can establish continuous, automated ingestion of Fusion audit logs without complex middleware or custom integrations.
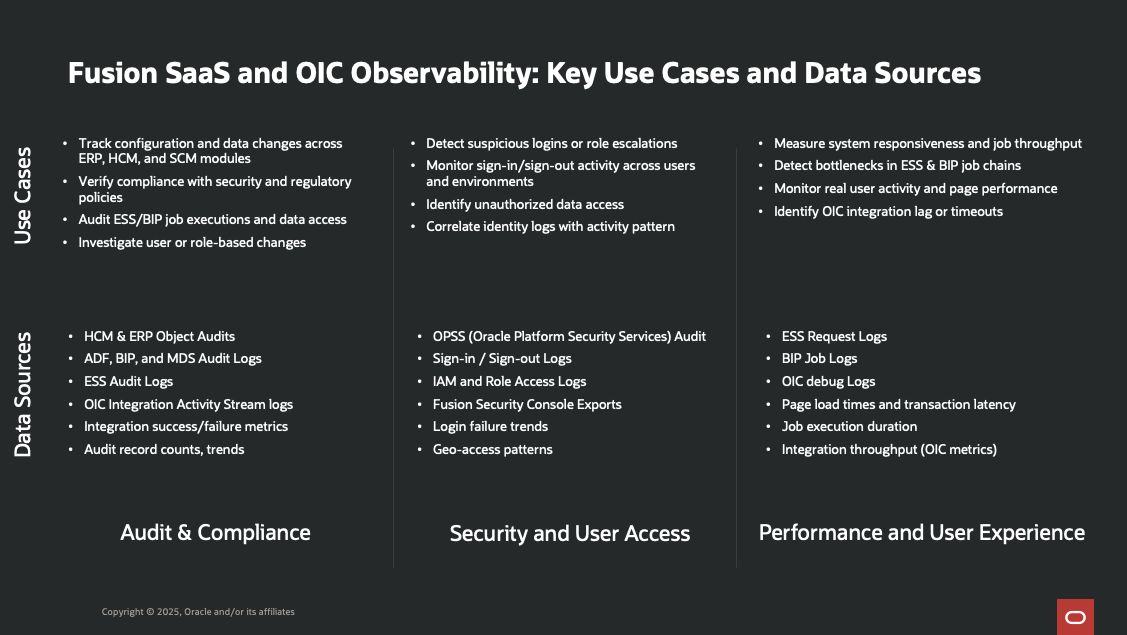
Figure 1: Fusion Application Audit Logs Key Use Cases
Note: If you want to monitor the ESS jobs performance and status, I have published a blog post on the Fusion Enterprise Scheduler Service (ESS) job request logs collection using OCI Management Agent and REST API log collection, you can find it here.
However, accessing and collecting Fusion Application audit logs requires understanding the complex permission model and configuring the appropriate integration mechanisms. This blog post addresses two critical aspects:
- Part 1: Understanding Required Permissions: What privileges and roles are needed to access Fusion audit log data
- Part 2: Setting Up Log Ingestion: Step-by-step configuration for Fusion Apps Audit Logs using OCI Management Agent and REST API log collection
Note: This guide focuses on Fusion Applications transaction and business object audit logs accessed via the Fusion Audit REST API. For IAM Identity Domain audit events (sign-in attempts, MFA challenges, session activity), these flow through OCI Audit and can be ingested via Service Connector - see Methods and Ways to Extract Session Information Using OCI Audit for that complementary approach.
Solution Design
Oracle Log Analytics enables continuous collection of Fusion Application audit logs through REST API-based log sources. The Management Agent acts as the collector, periodically invoking Fusion Applications REST APIs to fetch audit log data and forwarding it to Log Analytics for parsing, indexing, and analysis.
Reference Architecture:
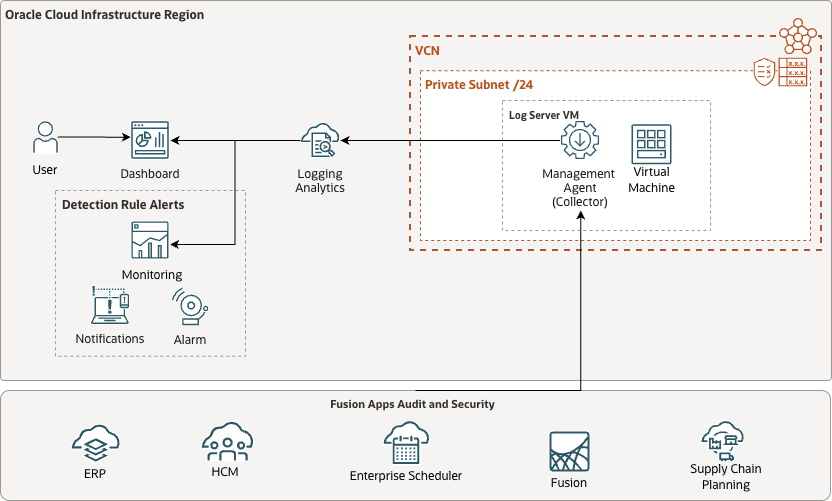
Figure 2: Fusion Application Audit Logs Reference Architecture
Prerequisites
Before proceeding with the implementation, ensure you have:
- An active OCI tenancy with appropriate IAM permissions
- Access to Oracle Fusion Applications with administrative privileges
- An OCI Compute instance (Oracle Linux) where the Management Agent will be installed
- Network connectivity between the Management Agent host and your Fusion Applications instance
- Understanding of your Fusion Applications POD URL and LOGIN URL (refer to Doc ID 2661308.1 in Oracle My Support)
- Create a service account in Fusion Applications for the Management Agent to use
Part 2: Step-by-Step Setup for Ingesting Fusion Application Audit Logs
This section provides detailed step-by-step instructions for setting up Fusion Application audit log collection using the Management Agent and REST API log ingestion method.
Note: OCI Log Analytics provides pre-defined log sources and parsers for Fusion Applications audit logs.
- Fusion Apps: SOA Audit Logs
- Fusion Apps: Sign In - Sign Out Activity Logs
- Fusion Apps: OPSS Audit Logs
- Fusion Apps: ODI Audit Logs
- Fusion Apps: OBIEE Audit Logs
- Fusion Apps: MDS Audit Logs
- Fusion Apps: HCM People Audit Logs
- Fusion Apps: HCM Payroll Audit Logs
Prerequisites
Before you set up log ingestion for Fusion Application Audit logs, ensure the following prerequisites are met:
-
Review the Fusion Applications REST API documentation to understand how to use the Audit Logs APIs, available endpoints, supported log types, and query mechanisms.
-
Ensure you have valid Fusion Applications credentials (username and password) with sufficient privileges to access the Audit Logs REST API. Privileges are typically assigned via appropriate Fusion Applications roles.
- Identify and note the required endpoints for your Fusion application instance:
- login_url: The login URL for Fusion Applications (e.g.,
https://<identity-domain>.fa.<region>.oraclecloud.com) - pod_url: The base URL for your Fusion Applications pod (e.g.,
https://<identity-domain>.fa.<region>.oraclecloud.com) - proxy_url (Optional): If your environment requires access through a proxy, provide the proxy server URL (
http(s)://<proxy-host>:<proxy-port>). - For more information on constructing and locating Fusion Application instance URLs, refer to Oracle My Support Doc ID 2661308.1.
Note: Sign-in Sign-out REST API is deprecated and no longer available after Fusion Identity Upgrade, starting Oracle Fusion 25B or higher. You will have to use the OCI Audit feature as per KB181606
- login_url: The login URL for Fusion Applications (e.g.,
- Ensure Fusion Applications REST API access is enabled for your environment:
- Confirm that users or application clients have the necessary REST API security privileges and duty roles to access audit logs endpoints.
- This includes role assignments such as
FND_VIEW_AUDIT_HISTORY_PRIVand other relevant product/duty roles depending on the audit log type. - REST API access is typically controlled by user provisioning or within the Fusion Applications Security Console.
- See Fusion Apps REST API Security Overview for details on configuring user access.
- (Optional) If outbound network traffic from the Management Agent host to Fusion Applications must traverse a proxy, ensure the proxy URL and credentials are available. Verify network routing allows connections from your OCI environment to the Fusion Applications REST endpoints.
Step 1: Install and Configure Management Agent
- Provision OCI Compute Instance:
- Provision an OCI Compute instance with Oracle Linux image
- Ensure the instance has HTTP/HTTPS access to your Fusion Applications POD URL
- Note the instance name (e.g.,
mgmtagent-vm)
- Enable Management Agent Plugin:
- Navigate to OCI Console > Compute > Instances
- Select your compute instance
- Go to the Oracle Cloud Agent tab
- Enable the Management Agent plugin
- Ensure the Logging Analytics plugin is deployed during installation
- Reference: Set Up Continuous Log Collection From Your Hosts
- Fusion Applications Entity Creation:
- An entity of type “Host (Linux)” will be automatically created in Log Analytics
- Navigate to OCI Console > Observability & Management > Log Analytics > Administration > Entities
- Verify the entity exists in the same compartment as your compute instance
- Note the entity name (should match your instance name, e.g.,
mgmtagent-vm) - Create a new entity with the following details:
- Name:
fusion-apps-mgmtagent-vm - Entity Type:
Oracle Fusion Applications - Management Agent Compartment:
your_mgmtagent_compartment_name - Management Agent:
Agent(mgmtagent-vm) - Properties:
- Property Name:
login_url - Property Value: The base URL of your Fusion Applications instance (e.g.,
https://<yourpod>.login.fa.us1.oraclecloud.com) - Property Name:
pod_url - Property Value: The base URL of your Fusion Applications instance (e.g.,
https://<yourpod>.fa.us1.oraclecloud.com) - Property Name:
proxy_url - Property Value: (Optional) The URL that sends a request to your proxy server
- Property Name:
- Agent Collection Properties:
- Source Type:
REST API - Historical Data:
30D(or your desired historical data fetching period) - Enable Filter Duplicate Records:
true - Customized Schedule:
FREQ=MINUTELY;INTERVAL=5(5 mins or your desired schedule interval)
- Source Type:
- Click Create
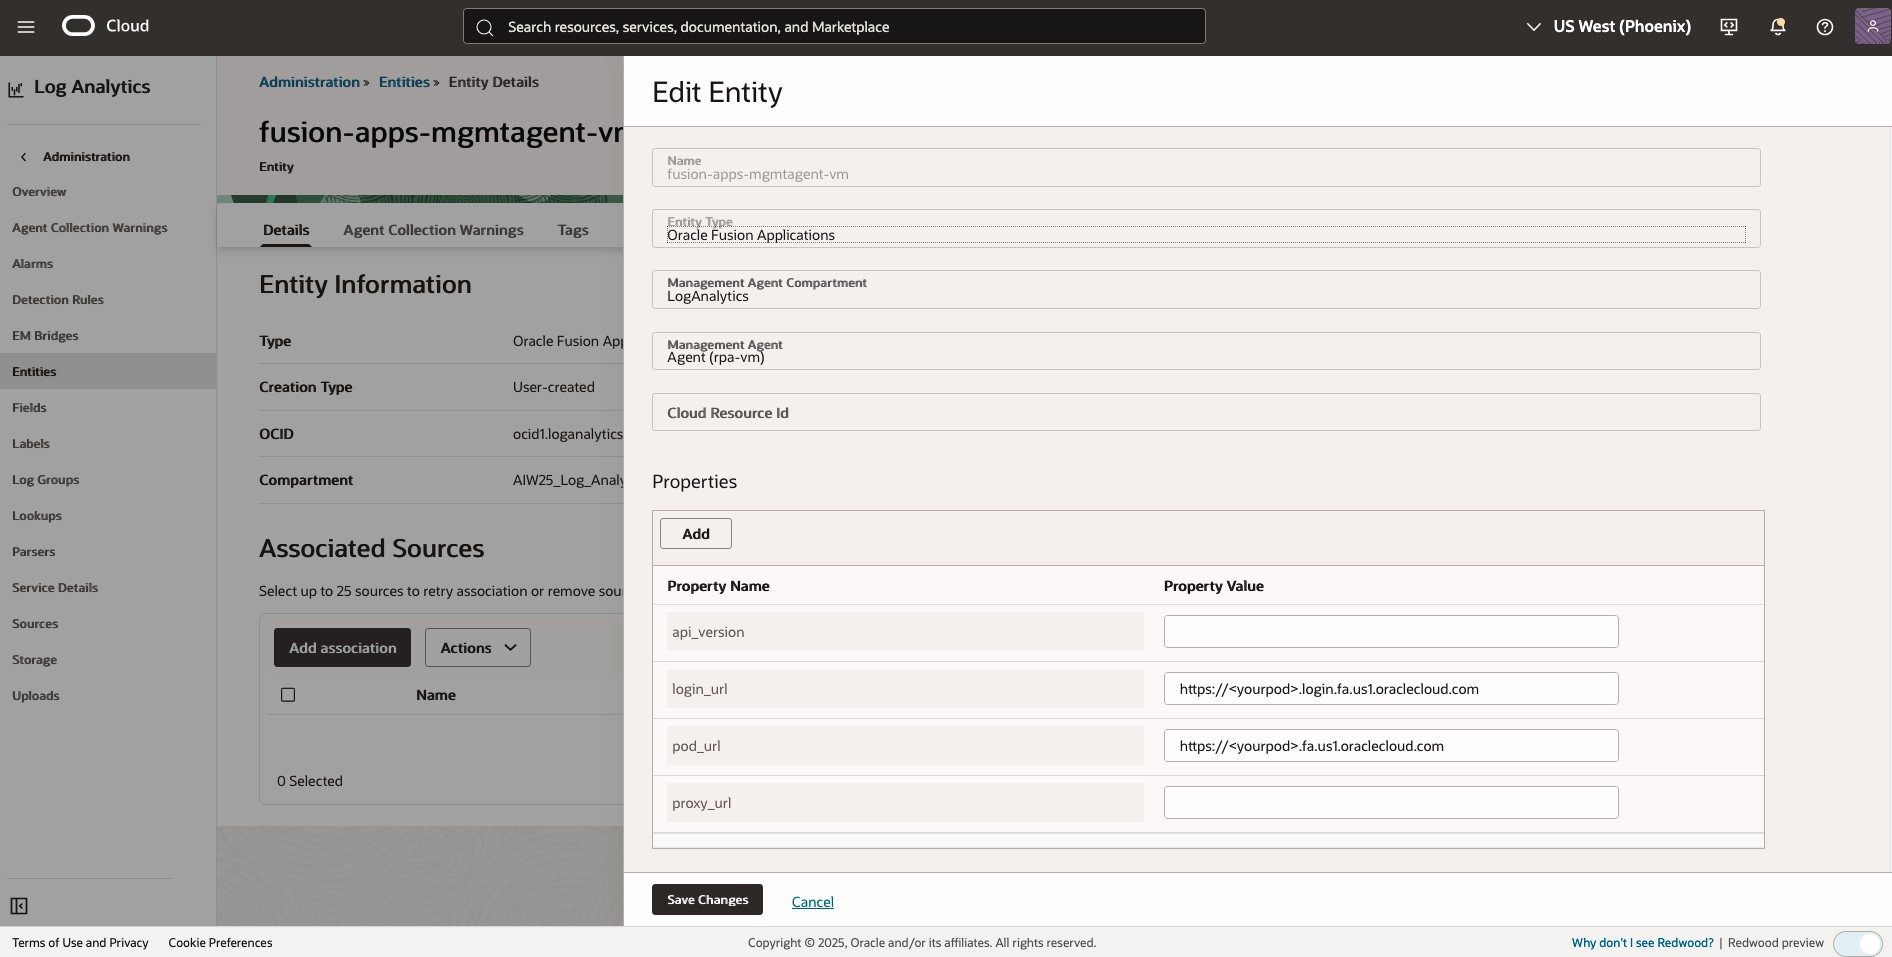
- Figure 3: Fusion Applications Entity Creation
- Name:
- Configure IAM Policies:
- Ensure policies are in place to allow Management Agent to send logs
- Reference: Allow Continuous Log Collection Using Management Agents
Step 2: Configure Management Agent Credentials
- SSH to the Compute Instance:
ssh opc@<your-mgmtagent-vm-compute-instance-ip> - Switch to Root User (if needed):
sudo su - - Navigate to Management Agent Bin Directory:
- For Management Agents running via Oracle Cloud Agent plugin:
cd /var/lib/oracle-cloud-agent/plugins/oci-managementagent/polaris/agent_inst/bin - For manually installed Management Agents:
cd /opt/oracle/mgmt_agent/agent_inst/bin
- For Management Agents running via Oracle Cloud Agent plugin:
- Create Credential JSON File:
Navigate to the appropriate /bin directory for your setup to create the credential JSON file. The following example shows the values provided in the
fapps.jsonfile:cat > /tmp/FA-CREDS.json << EOF { "source": "lacollector.la_rest_api", "name": "FA-CREDS", "type": "HTTPSBasicAuthCreds", "description": "These are HTTPS (BasicAuth) credentials.", "properties": [ { "name": "HTTPSUserName", "value": "USER" }, { "name": "HTTPSPassword", "value": "PASS" } ] } EOFReplace
your_service_account_usernameandyour_service_account_passwordwith your Fusion Applications service account credentials. - Insert Credentials into Agent Credential Store:
cat fapps.json | ./credential_mgmt.sh -s logan -o upsertCredentials - Verify Credential Storage:
./credential_mgmt.sh -o listCredentials -s logan | grep FA-CREDSReference: Management Agent Source Credentials
Step 3: Associate Source with Entity and Start Collection
- Validate the Log Source Endpoint Configuration:
- Navigate to OCI Console > Observability & Management > Log Analytics > Administration > Sources
- Click on the log source (e.g.,
Fusion Apps: Sign In - Sign Out Activity Logs) - Click Customize
- Click the endpoint … > View to inspect the endpoint configuration
- Navigate to Entity Details:
- Go to OCI Console > Observability & Management > Log Analytics > Administration > Entities
- Click on your entity (e.g.,
fusion-apps-mgmtagent-vm)
- Add Data Source:
- Click Add Data
- Select the entity (e.g.,
fusion-apps-mgmtagent-vm) - Click Next
- Select Log Sources:
- Search for Fusion Apps: to filter Fusion Applications sources
- Select the log sources you want to collect (e.g.,
Fusion Apps: Sign In - Sign Out Activity Logs, Fusion Apps: OPSS Audit Logs, Fusion Apps: ESS Audit Logs) 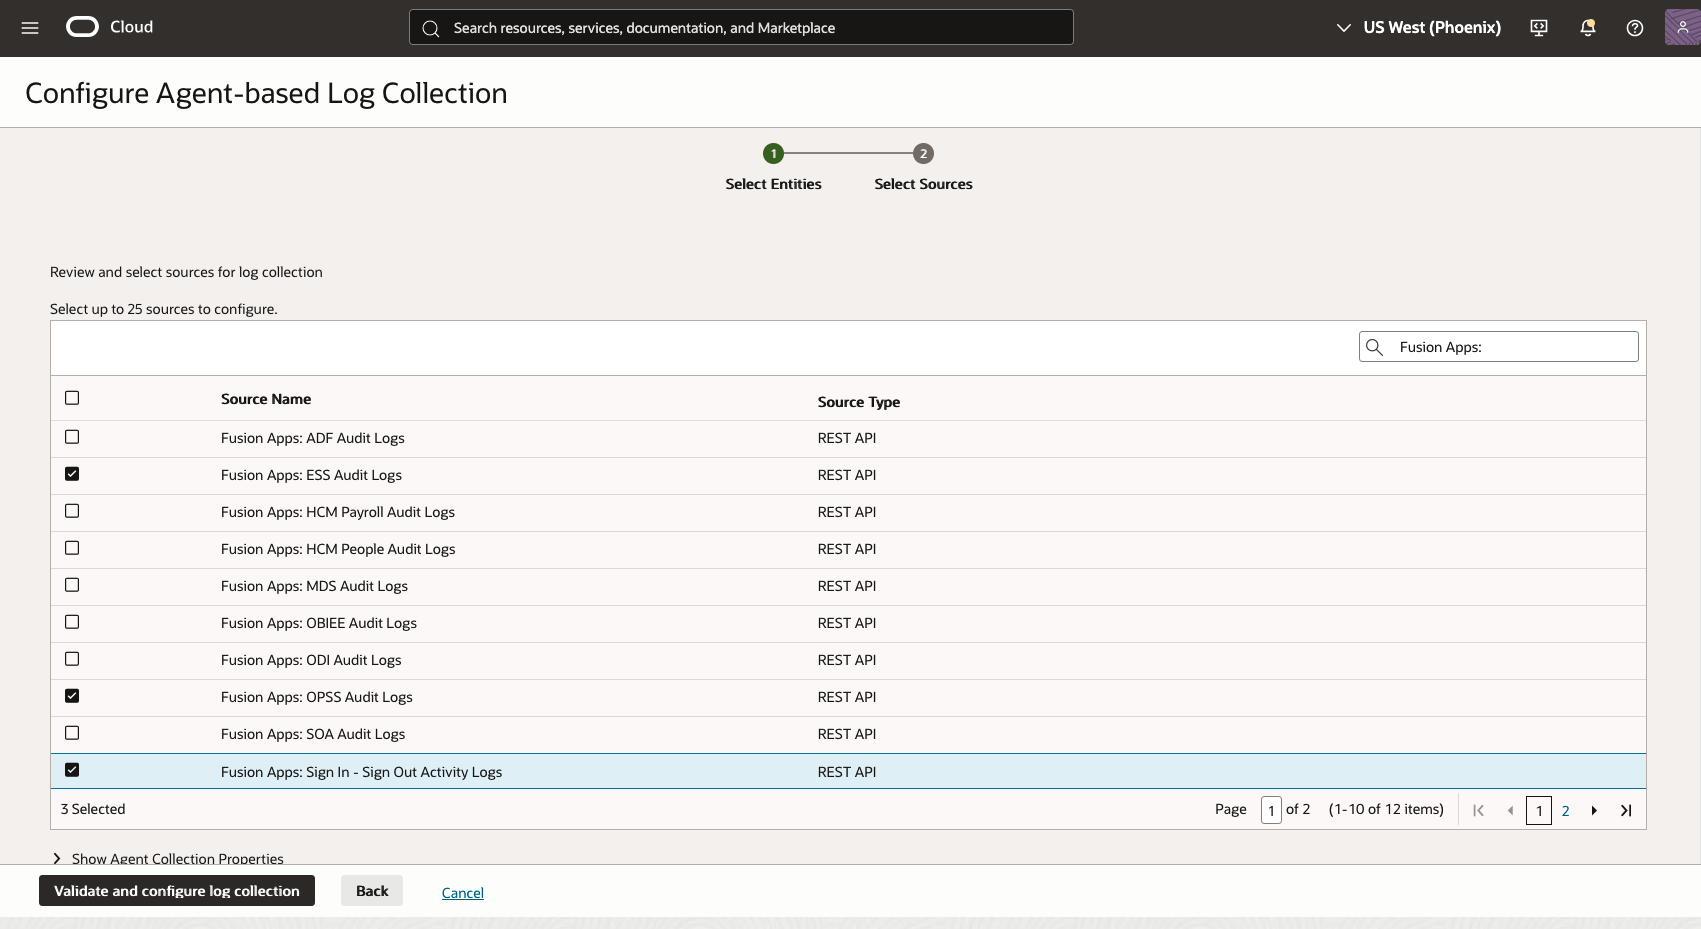
- Figure 4: Log Analytics Fusion Apps Audit Select Log Sources
- Verify the Agent Collection Properties are correctly configured
- Select the correct log group to store log data for new association
- Click Validate and configure log collection
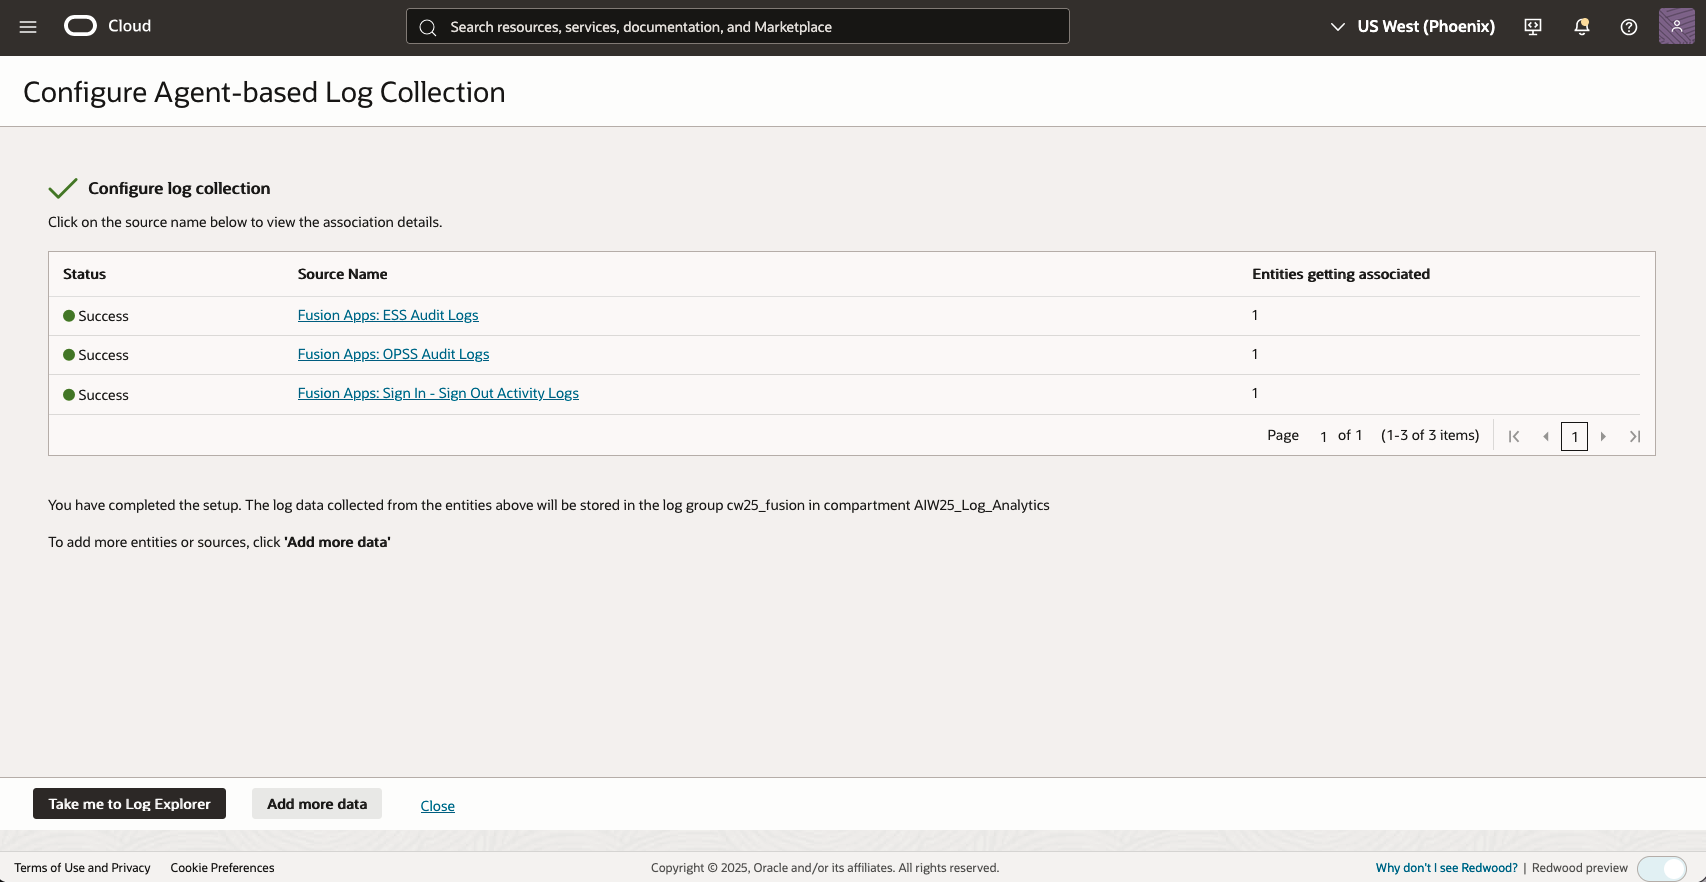
- Figure 5: Log Analytics Fusion Apps Audit Validate and Configure Log Collection
- Start Collection:
- Once configured, click Take me to Log Explorer to verify log ingestion
Step 4: Verify Log Ingestion
- Navigate to Log Explorer:
- Go to OCI Console > Observability & Management > Log Analytics > Log Explorer
- Or use the link provided after configuration
- Query Audit Logs:
- In the search bar, enter a query to find Fusion Applications Sign-in/Sign-out activity logs:
'Log Source' in ('Fusion Apps: ESS Audit Logs', 'Oracle Fusion Apps: OPSS Audit Logs', 'Fusion Apps: OPSS Audit Logs', 'Fusion Apps: MDS Audit Logs') | stats count as logrecords by 'Log Source' | sort -logrecords - To verify sign-in/sign-out activity (if enabled):
'Log Source' = 'Fusion Apps: Sign In - Sign Out Activity Logs' | stats count as logrecords by 'Log Source' | sort -logrecords - Adjust the time range to see recent logs
- Click Run Query
- In the search bar, enter a query to find Fusion Applications Sign-in/Sign-out activity logs:
Step 5: Import Dashboards
- Locate Dashboards on GitHub:
- Find the pre-built Log Analytics dashboard JSON files for Fusion Apps audit logs on the Oracle o11y solutions GitHub repository.
- Common dashboard files:
Oracle Fusion User Access.jsonOracle Fusion Apps_OPSS Audit Analysis.jsonOracle Fusion Apps_SOA.jsonOracle Fusion Apps_Data Service (MDS) Unified.jsonOracle Human Capital Management_Business Objects.jsonFusion OIC Process Monitoring.json
- Import the Dashboard in OCI Log Analytics:
- Go to OCI Console → Observability & Management → Log Analytics → Dashboards.
- Click on Import dashboards.
- Browse to the downloaded dashboard
.jsonfile and select it.
Conclusion
By following the process outlined in this guide, you can establish a robust and streamlined approach to collecting, monitoring, and analyzing audit logs from Oracle Fusion Applications within OCI Log Analytics. Automating audit log ingestion via REST APIs and the OCI Management Agent empowers your organization to consolidate critical audit and user activity data in one place—enabling you to:
- Increase Visibility and Control: Monitor user interactions and system events across Fusion Applications to strengthen governance and transparency.
- Simplify Compliance Reporting: Generate comprehensive audit trails that support both external regulatory requirements and internal policies.
- Drive Operational Insight: Leverage centralized log data to uncover usage trends, improve business processes, and support data-driven decision making.
- Accelerate Threat Detection: Quickly identify anomalies and act on potential threats using advanced analytics and visualization capabilities.
Integrating your Fusion Applications audit logs with OCI Log Analytics not only simplifies adherence to audit and compliance obligations, but also transforms raw log data into actionable intelligence. This approach enhances your organization’s ability to safeguard data, comply with regulations, and maximize the value derived from your Oracle Cloud investments.
References
- ESS Roles Documentation
- Enable Audit for Oracle Platform Security Services
- Set Up REST API Log Collection
- Ingest Fusion Applications Audit Logs
- Fusion Applications Audit Policies
- Fusion Applications Audit Report API
- HCM REST API Authorization
- How to Get User Sign-in Sign-out Information?
- Create a Fusion Service Integration User Account
- REST API Quick Start
- Set Up Continuous Log Collection From Your Hosts
- Allow Continuous Log Collection Using Management Agents
- Management Agent Source Credentials
- Doc ID 2661308.1 - Fusion Applications URLs and Configuration
- Doc ID 2059102.1 - How To Configure And Use Audit In BI Publisher For Fusion SaaS Cloud Customers
- Doc ID 2731495.1 - Fusion Applications OTBI: How To Configure And Use Audit For Usage and Performance In OTBI For Fusion SaaS Cloud Customers