Real User Monitoring for Oracle Fusion SaaS Cloud Apps with OCI APM Browser Agent
Real User Monitoring for Oracle Fusion SaaS Cloud Apps with OCI APM Browser Agent
Authors: Royce Fu and Robert Brouwer, Software Development, OCI Application Performance Monitoring
Introduction
Oracle Fusion Applications represent one of the most comprehensive enterprise SaaS solutions, supporting critical business functions across Human Capital Management (HCM), Enterprise Resource Planning (ERP), Supply Chain Management (SCM), and Customer Experience (CX). As organizations increasingly rely on Fusion Cloud Apps for mission-critical operations, understanding the real user experience becomes paramount for ensuring optimal performance, identifying bottlenecks, and maintaining user satisfaction.
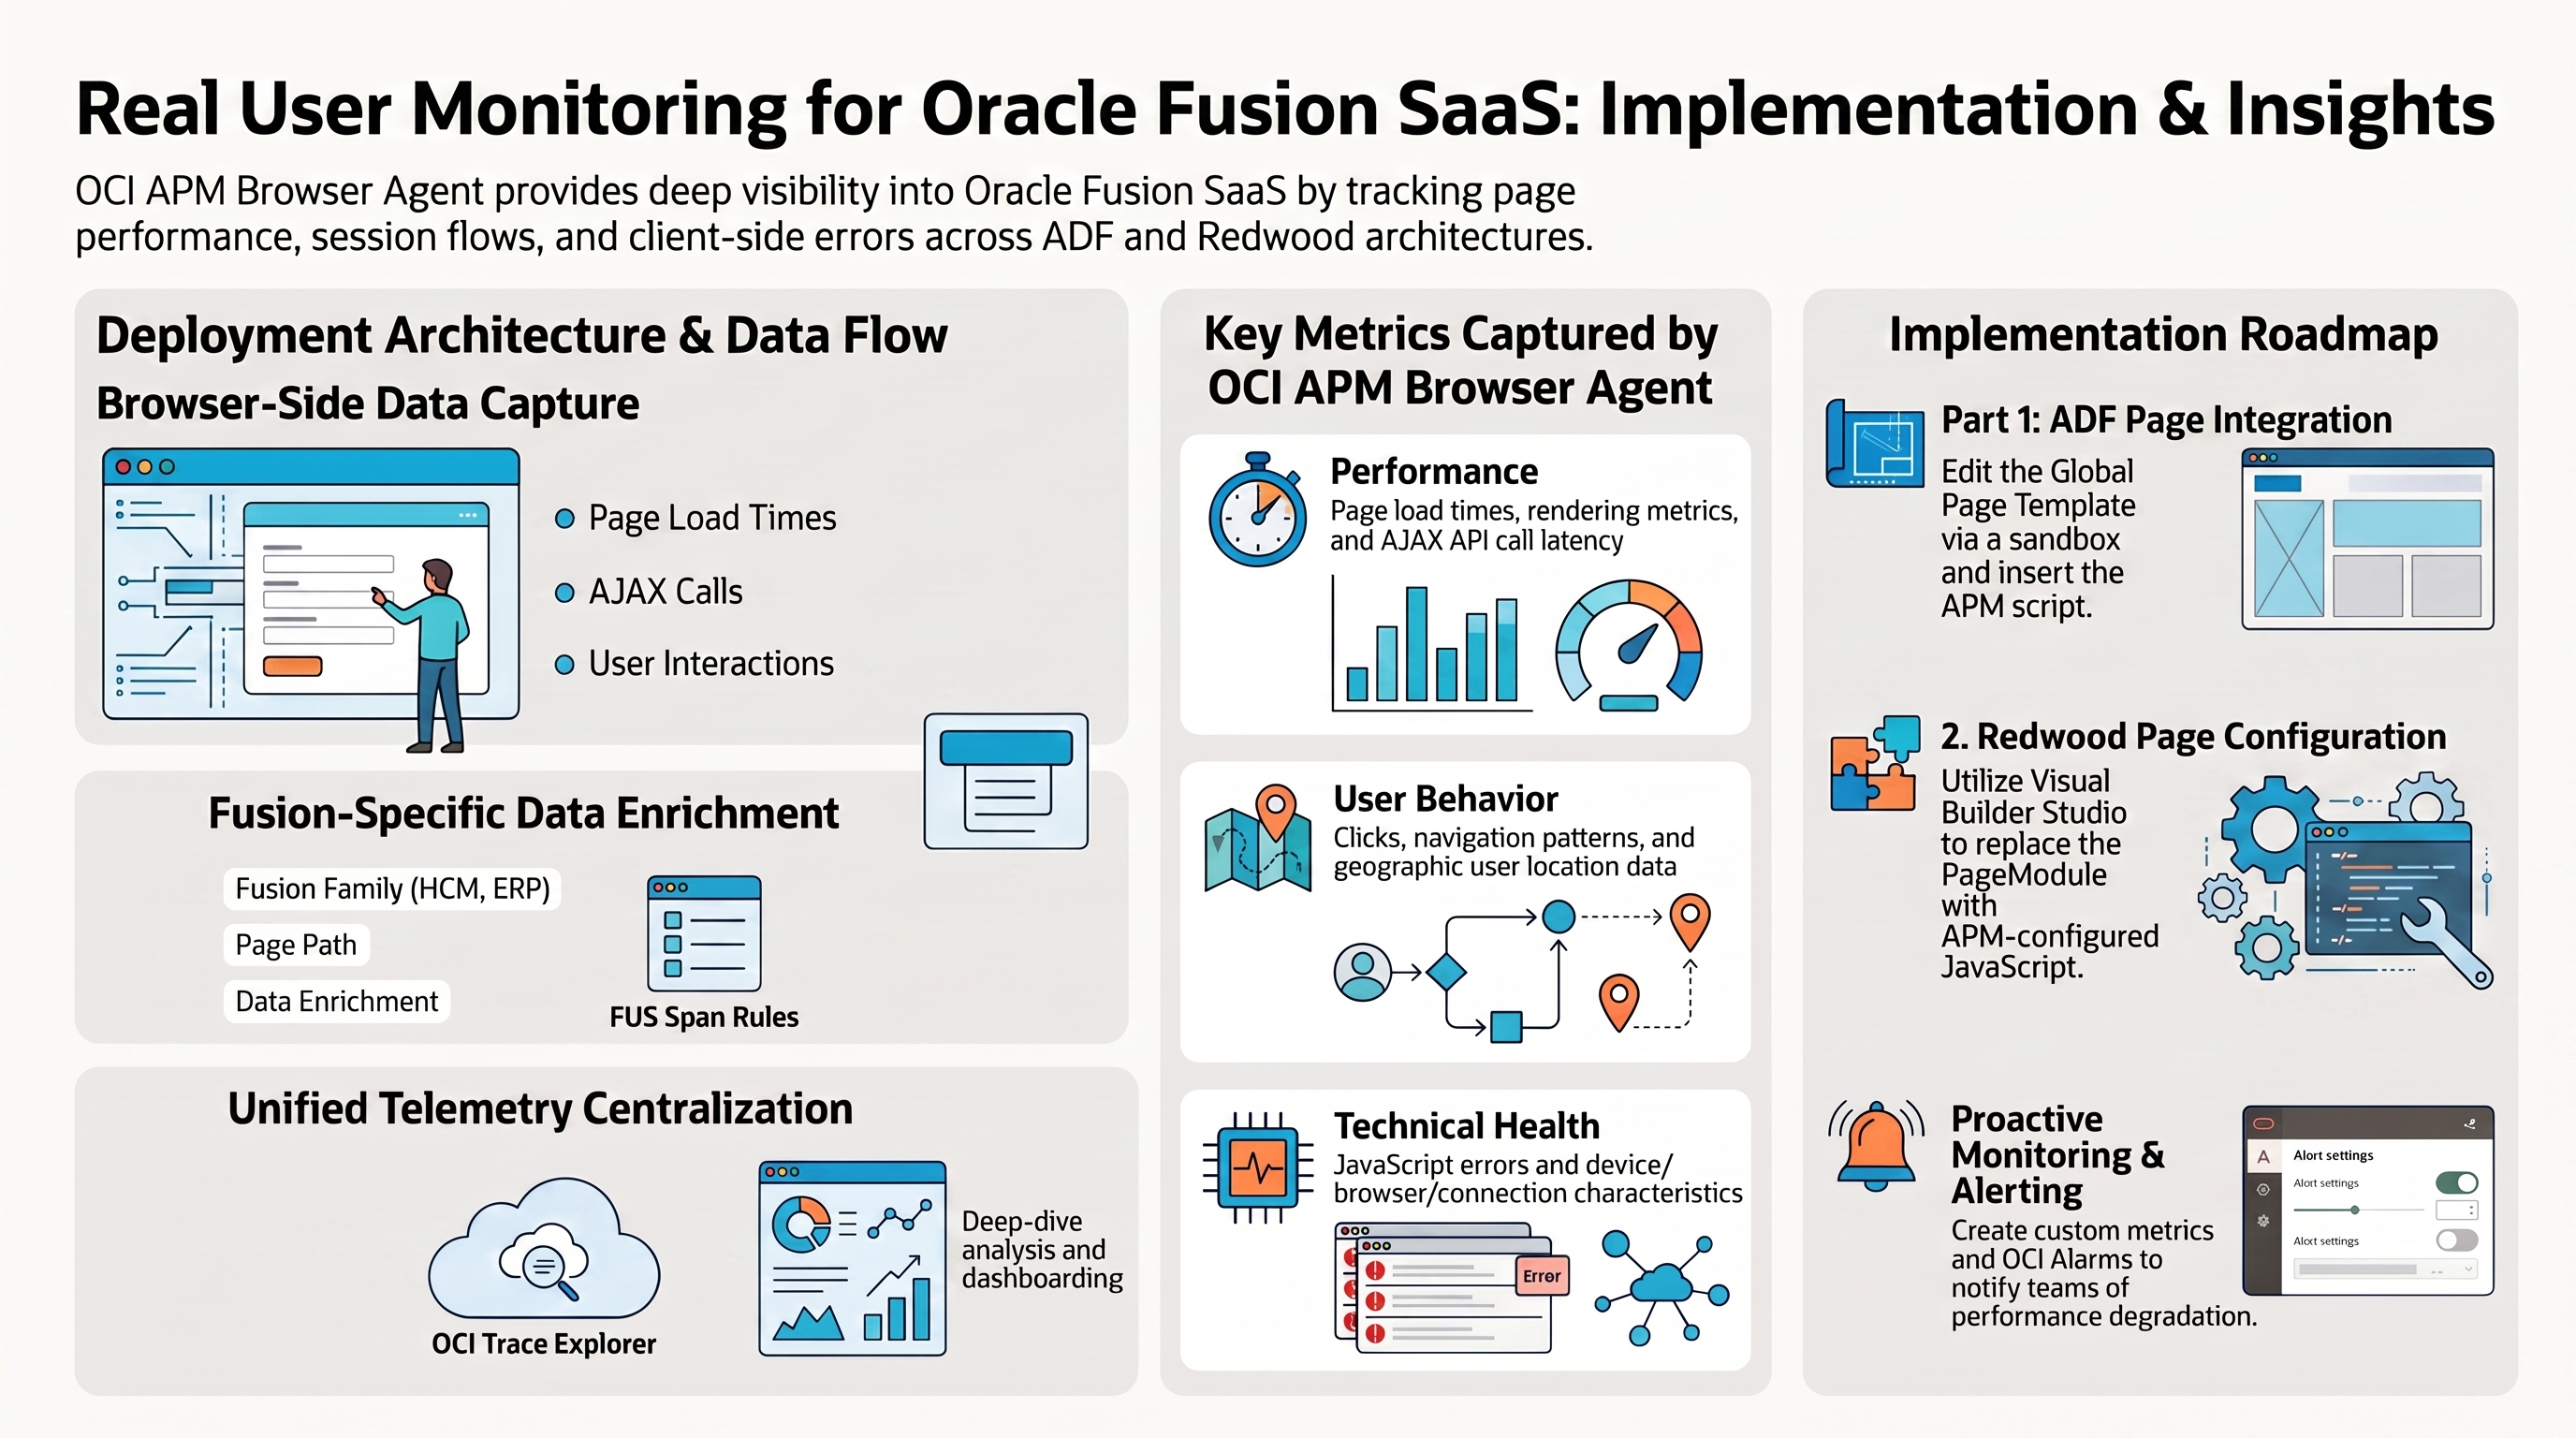
Oracle Cloud Infrastructure (OCI) Application Performance Monitoring (APM) Real User Monitoring (RUM) Browser Agent provides a powerful solution for gaining deep visibility into how users interact with Fusion Cloud Applications. By deploying the APM Browser Agent, organizations can monitor real user sessions, track page performance, analyze user behavior patterns, and correlate performance metrics with business outcomes—all from the browser perspective.
This blog post provides a comprehensive guide to implementing OCI APM RUM Browser Agent for Oracle Fusion SaaS Cloud Apps, covering both ADF (Application Development Framework) and Redwood page implementations, and exploring key use cases that enable data-driven performance optimization.
Reference Architecture: OCI APM Real User Monitoring for Oracle Fusion SaaS Cloud Apps
OCI APM Real User Monitoring captures user interaction data directly from the browser, providing comprehensive insights into the actual user experience. The APM Browser Agent records:
- Page Load Performance: Complete page load times, resource loading, and rendering metrics
- User Interactions: Clicks, navigation patterns, and user session flows
- AJAX Calls: API call performance and error rates
- JavaScript Errors: Client-side errors that impact user experience
- Geographic Data: User location-based performance analysis
- Device Information: Browser, device type, and connection characteristics
- Application Performance Index (Apdex): Standardized performance scoring
The APM Browser Agent sends browser spans and RUM metrics to OCI APM, where they can be visualized in Trace Explorer and Metrics Explorer, enabling comprehensive analysis of user experience across Fusion Cloud Applications. Beyond deep-dive analysis, this telemetry allows you to utilize out-of-the-box RUM Dashboards and define Custom Metrics to detect and alert on Fusion environment performance issues proactively.
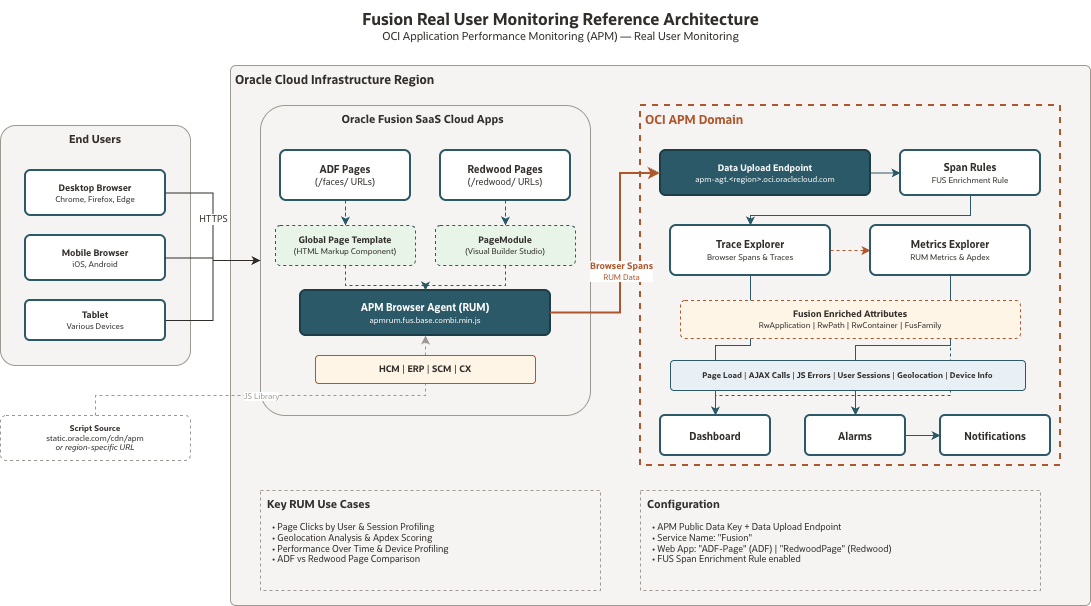 Figure 1: OCI APM Real User Monitoring for Oracle Fusion SaaS Cloud Apps
Prerequisites
Before implementing APM RUM for Fusion Cloud Apps, ensure you have:
- OCI APM Domain: An active APM domain in your OCI tenancy
- Follow these quick steps to create a domain:
- Sign in to the Oracle Cloud Infrastructure console.
- Open the navigation menu, click Observability & Management, and under Application Performance Monitoring, click Administration.
- Select your target compartment, click Create APM Domain, and fill in the required details (Name, Compartment, Description, etc.).
- Click Create APM domain and wait for the domain to be provisioned.
- For full setup details, see Create an APM Domain.
- Follow these quick steps to create a domain:
- APM Data Key: The public data key from your APM domain
- Navigate to APM Domain > Resources > Data Keys
- Copy the Public Data Key
- Data Upload Endpoint: The OCI data upload endpoint URL for your APM domain
- Format:
https://<domain-id>.apm-agt.<region>.oci.oraclecloud.com - Found in APM Domain > Administration > Data Upload Endpoint
- Copy the Data Upload Endpoint
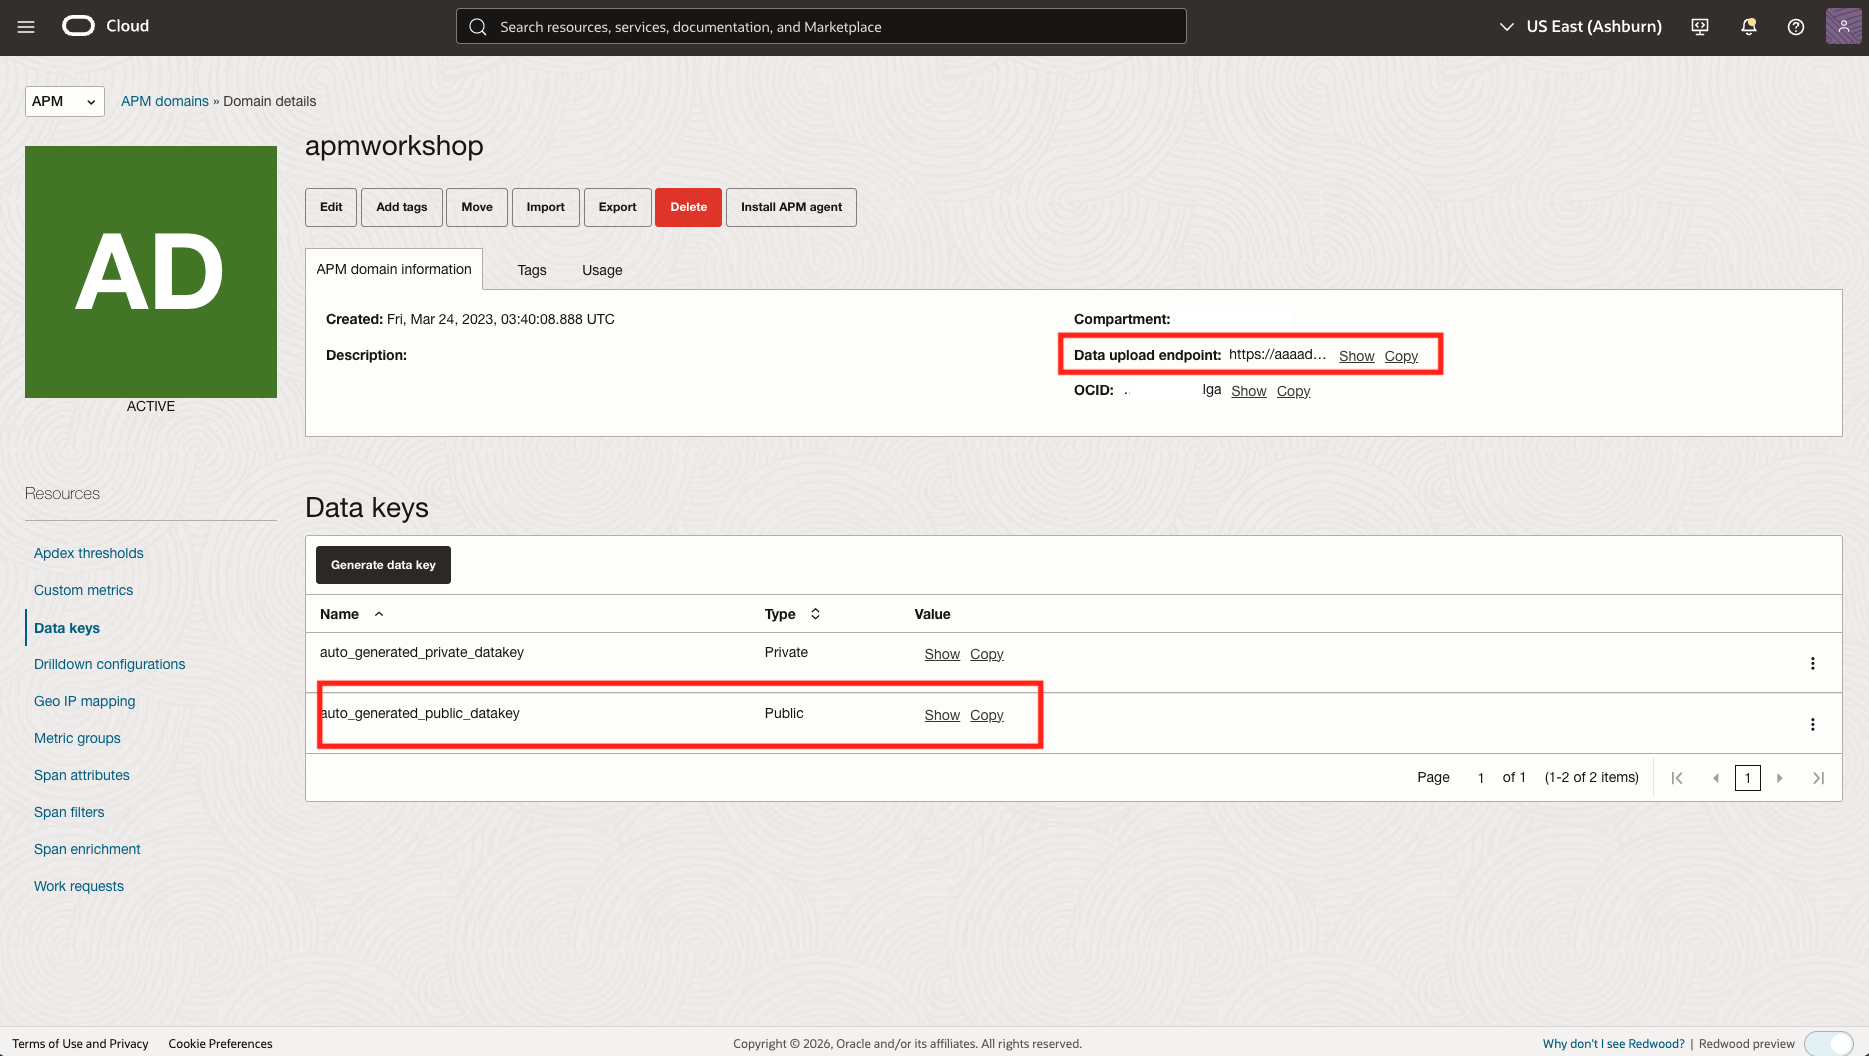 Figure 2: OCI APM Data Key and Data Upload Endpoint
- Format:
-
ADF Sandbox Access: Ability to create and publish sandboxes in Fusion Applications
- Redwood Visual Builder Studio project access: Ability to export, import, preview, and publish an application-extension workspace for Fusion Redwood pages.
- Note: The Fusion role alone does not grant access to VB Studio — the user also needs a VB Studio role in the Identity Domain.
- If role synchronization is enabled (the common case), assign one of:
ORA_SYNC_ENABLED_ADMINISTRATOR_ABSTRACT— maps to VB Studio AdministratorORA_SYNC_ENABLED_DEVELOPER_ABSTRACT— maps to VB Studio Developer (These are assigned in the Fusion Security Console and auto-sync to the Identity Domain.)
- If role synchronization is disabled, you must manually assign in the Identity Domain console:
DEVELOPER_ADMINISTRATOR— VB Studio admin access (create projects, manage settings)DEVELOPER_USER— VB Studio developer access (create/develop projects).
Implementation: Deploying APM Browser Agent
Oracle Fusion Applications consist of two distinct page architectures, each requiring a specific implementation approach:
- ADF Pages: Legacy pages identified by
/faces/in the URL - Redwood Pages: Modern pages identified by
/redwood/in the URL
For complete coverage, you must implement the APM Browser Agent for both page types.
Part 1: Adding RUM Agent to Fusion ADF Pages
ADF pages use a global page template that can be customized to include the APM Browser Agent across all ADF pages in your Fusion instance.
Step 1: Access Global Page Template Editor
- Log in to your Fusion Cloud Application
- Navigate to Settings > Actions > Edit Global Page Template
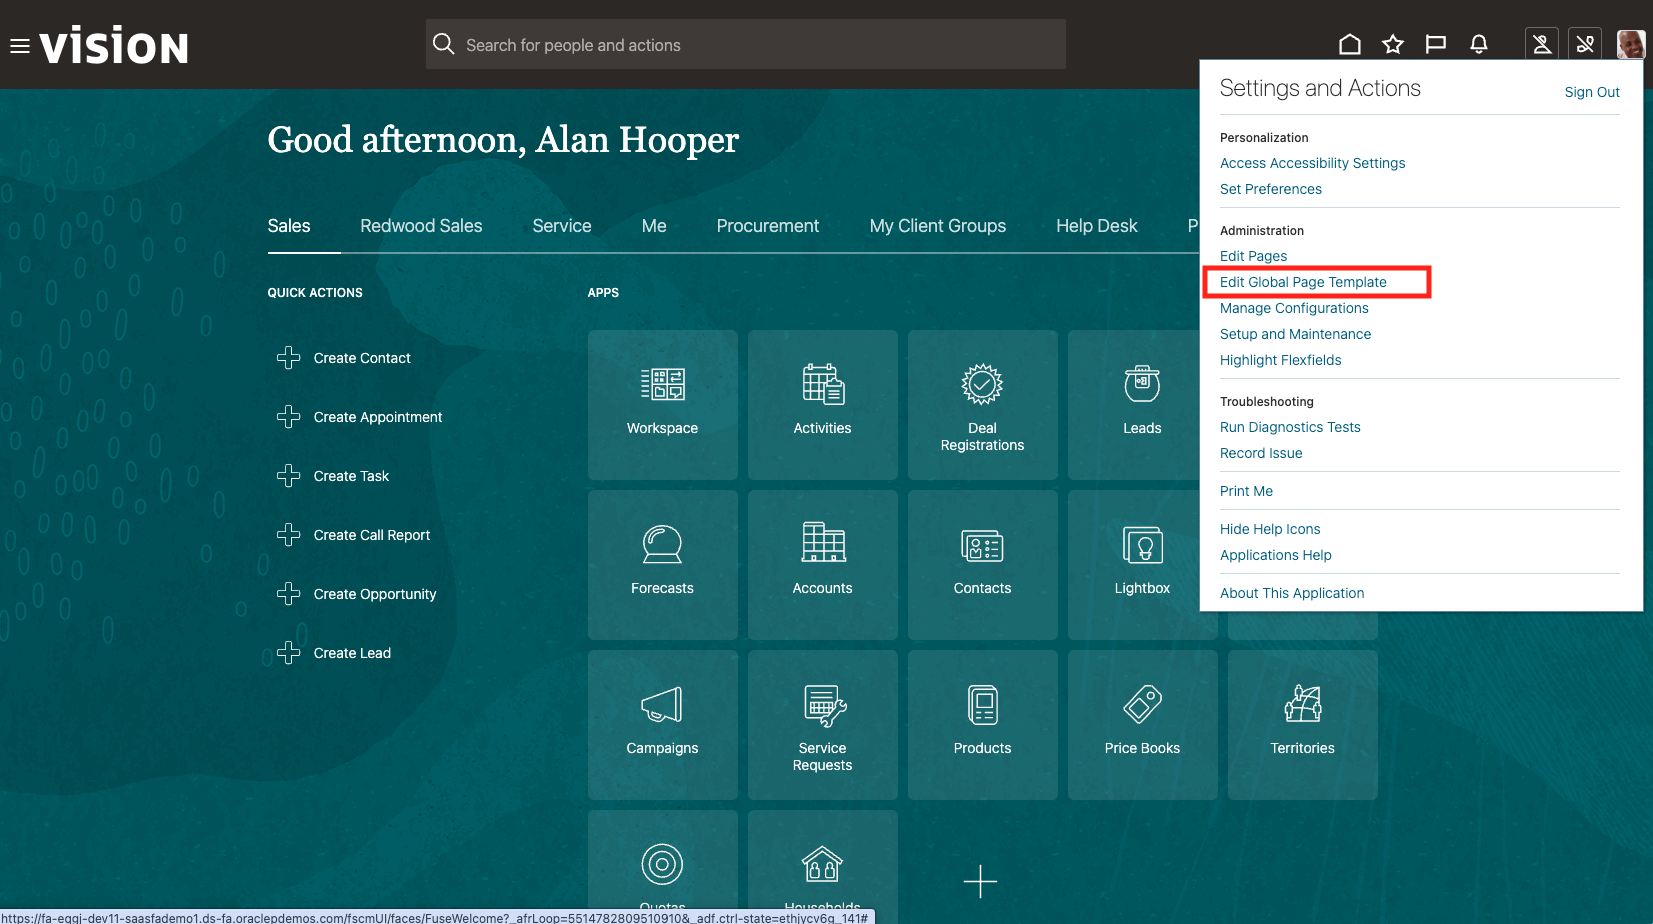 Figure 3: Edit Global Page Template
- Create or activate a sandbox:
- Click Activate a Sandbox
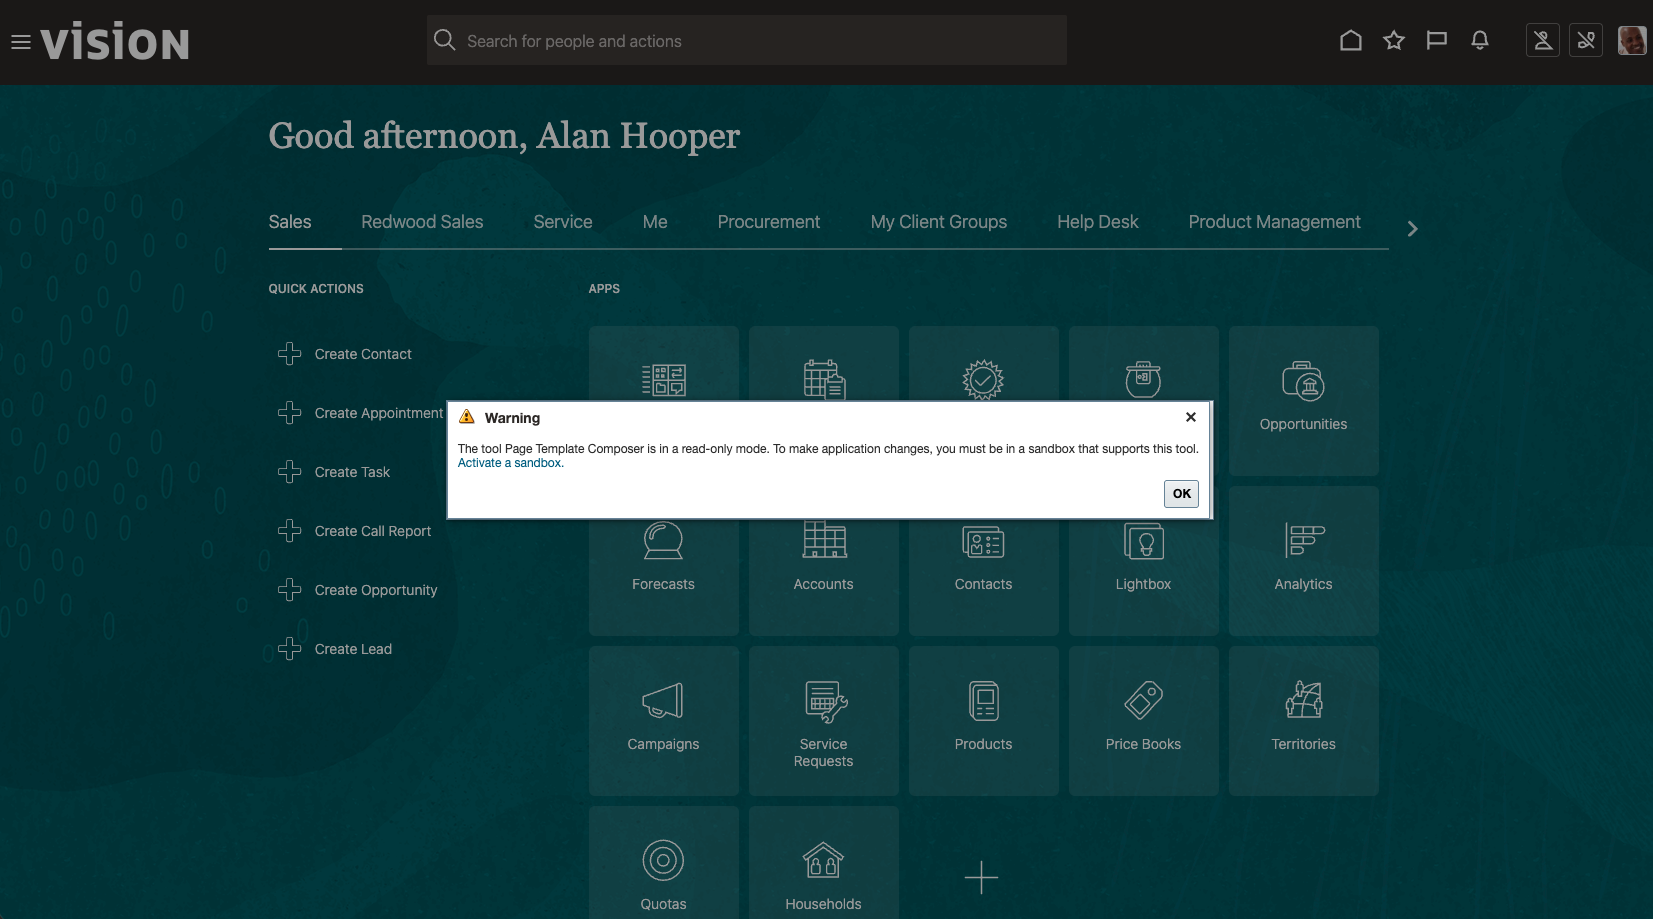 Figure 4: Activate a Sandbox
- Select Page Template Composer option
- Click Create and Enter
- Enter the sandbox by clicking on its name
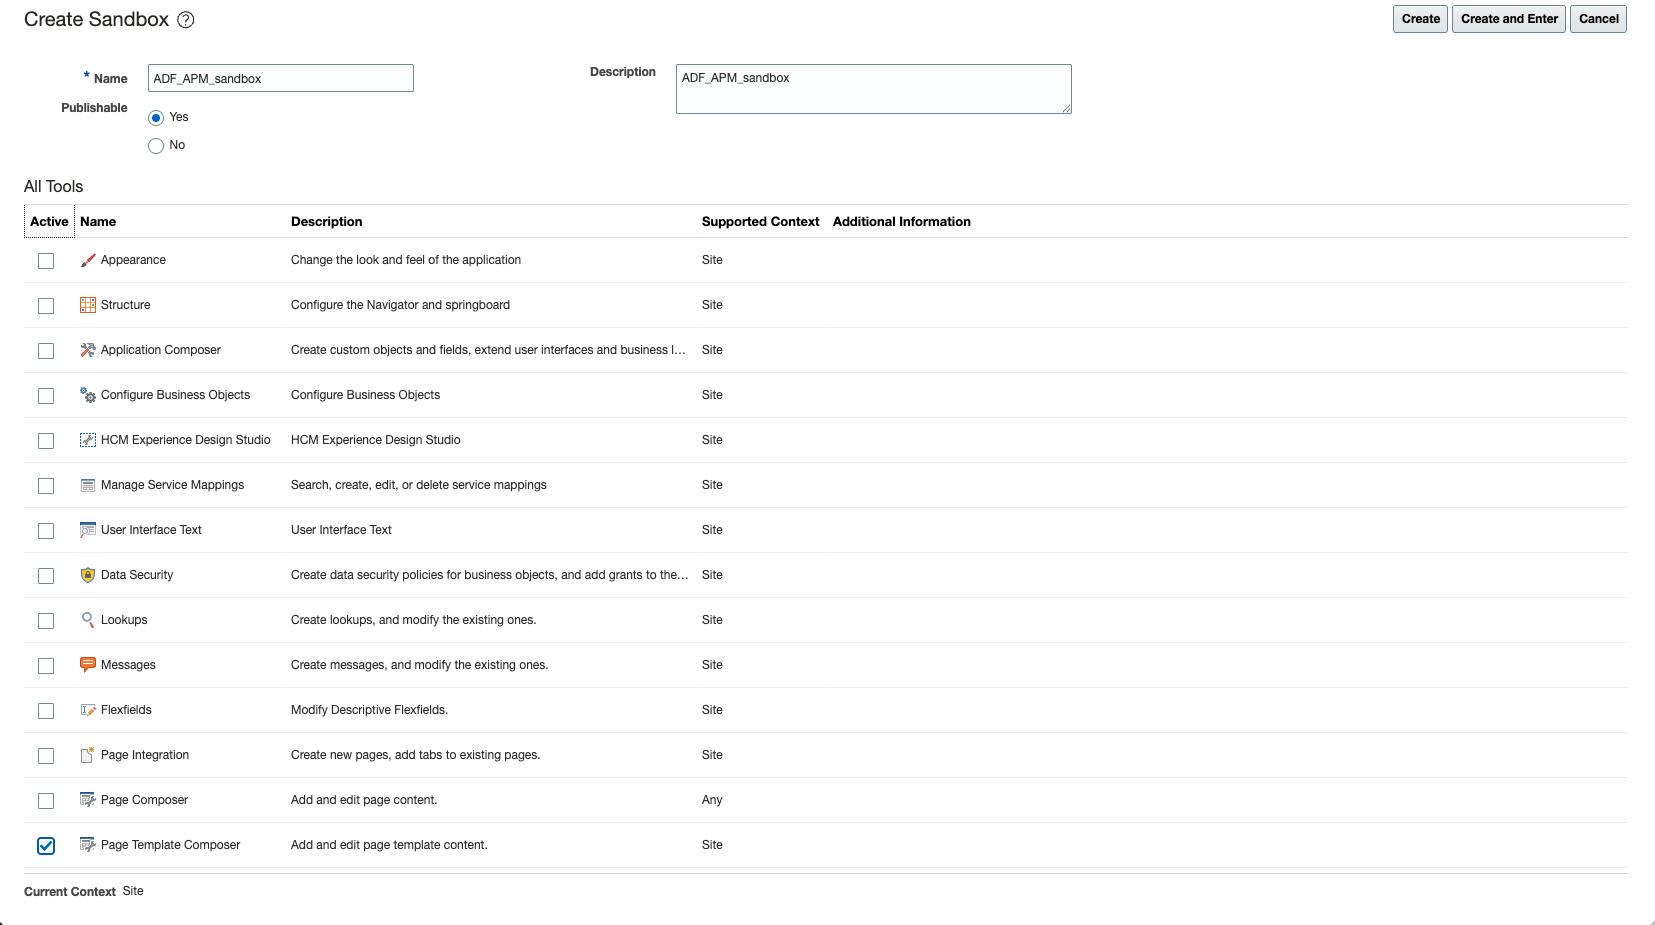 Figure 5: Create Sandbox
Step 2: Edit the Template
- Click Edit Global Page Template from the menu (now that you’re in a sandbox)
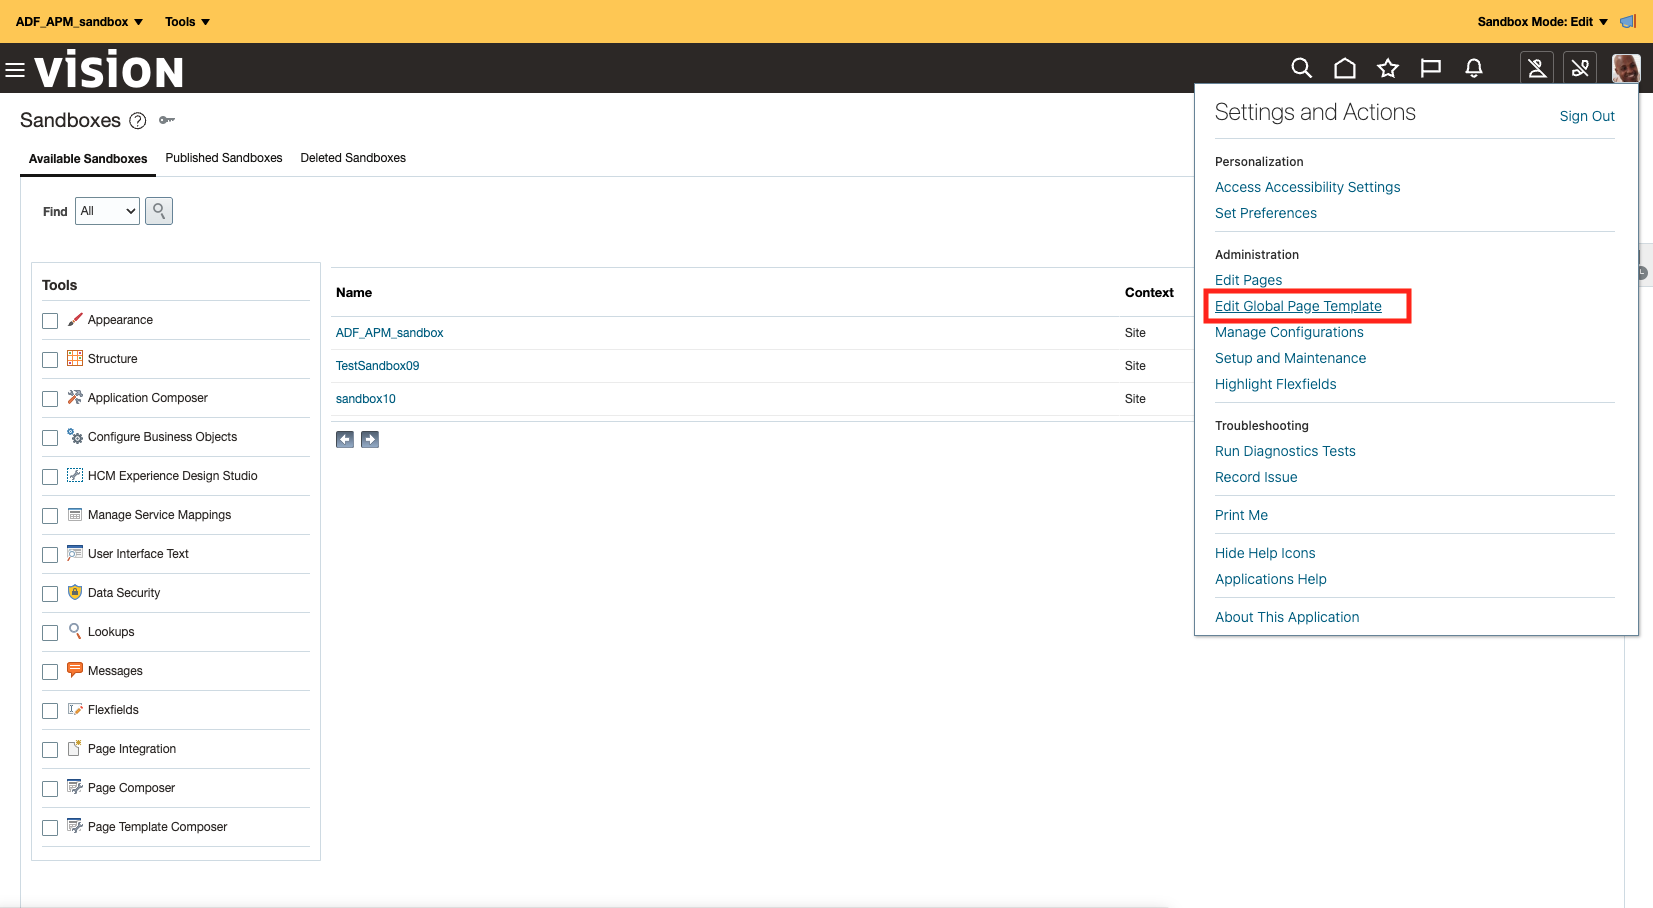 Figure 6: Edit Global Page Template
- Ensure the page is in Design mode
-
When active, you’ll see a bar with ‘Add content’ ‘Select’ ‘Structure’ 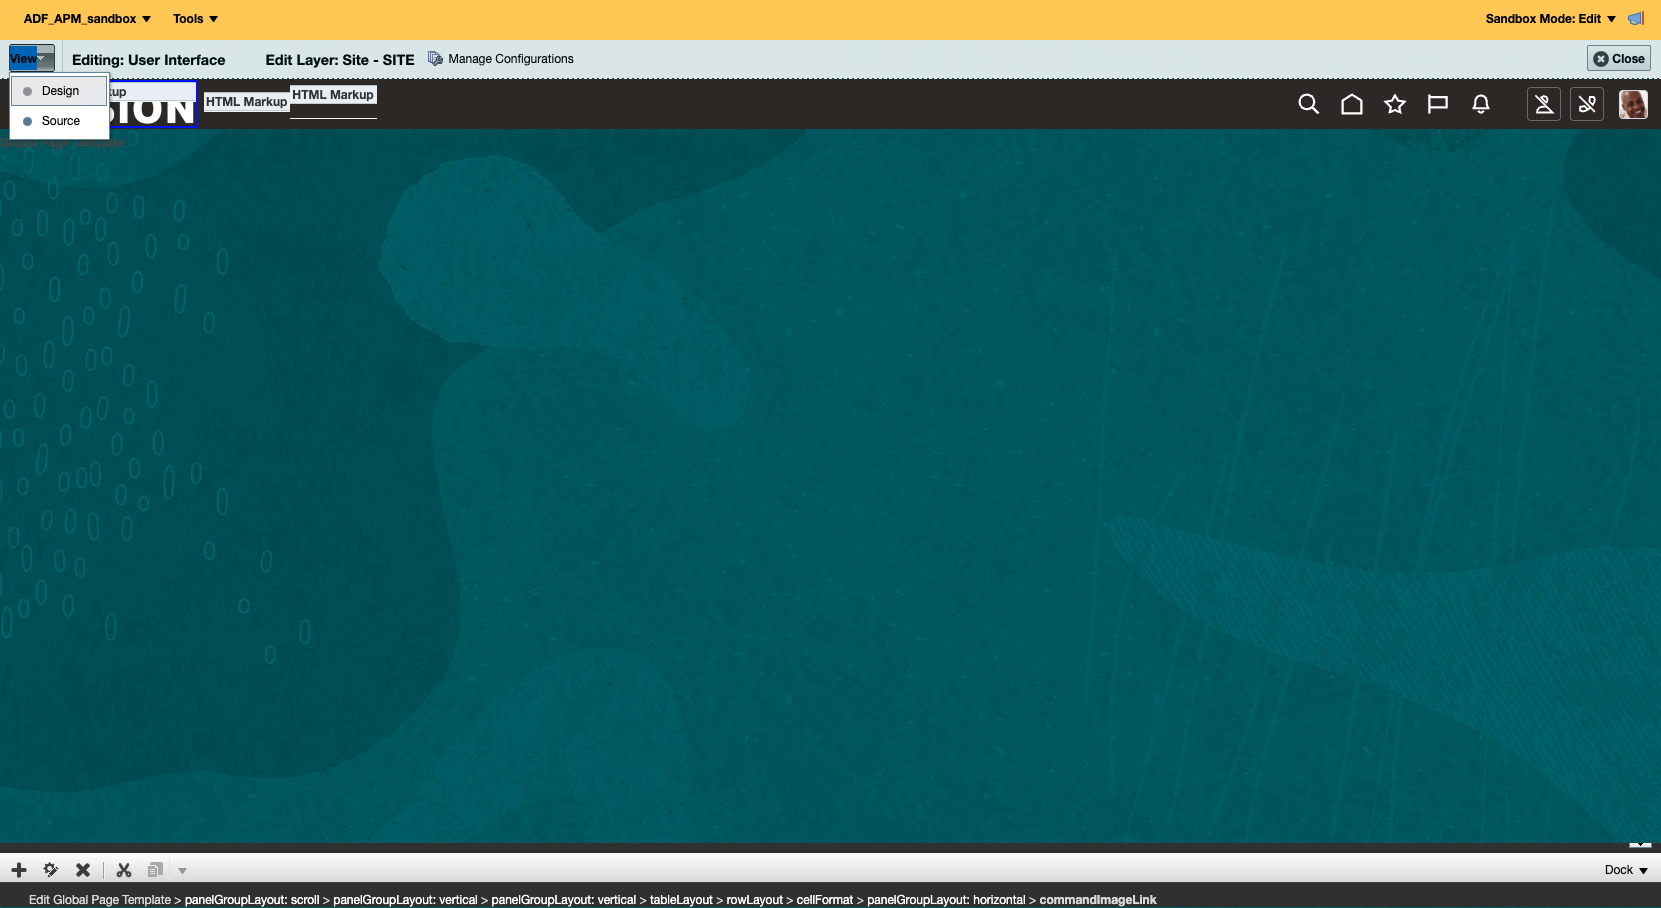 Figure 7: Design Mode
-
- Select Structure from that bar
- Click the ”+” symbol at the bottom to add a new HTML markup component
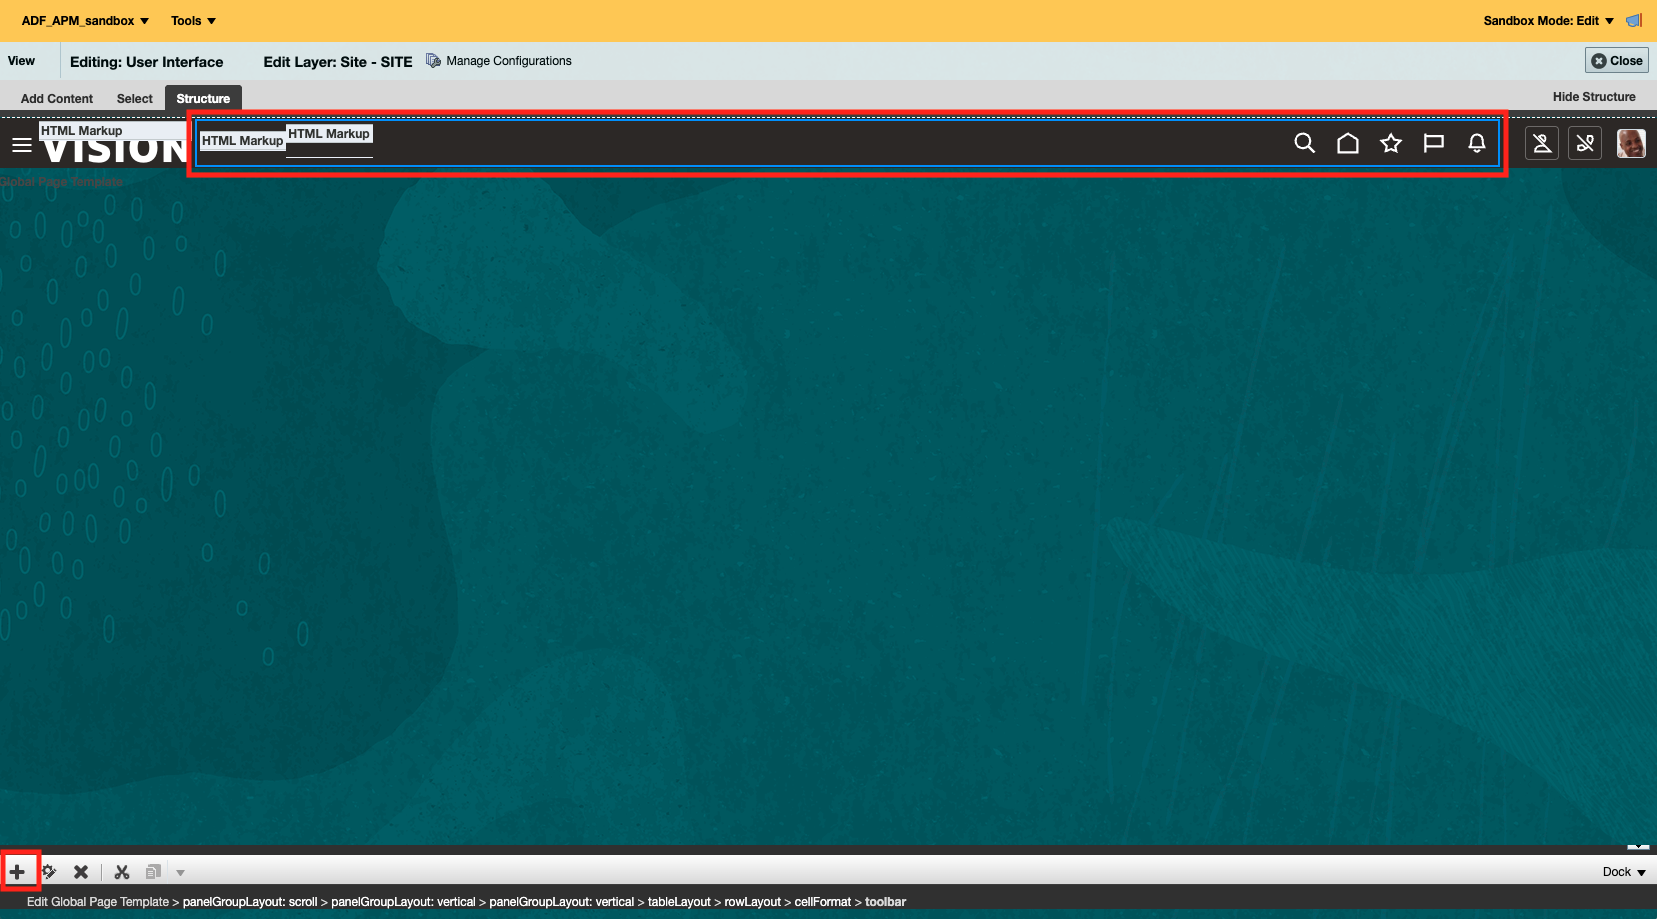 Figure 8: Add Component
- Select Component and click Add to add the HTML Markup, then Close the popup
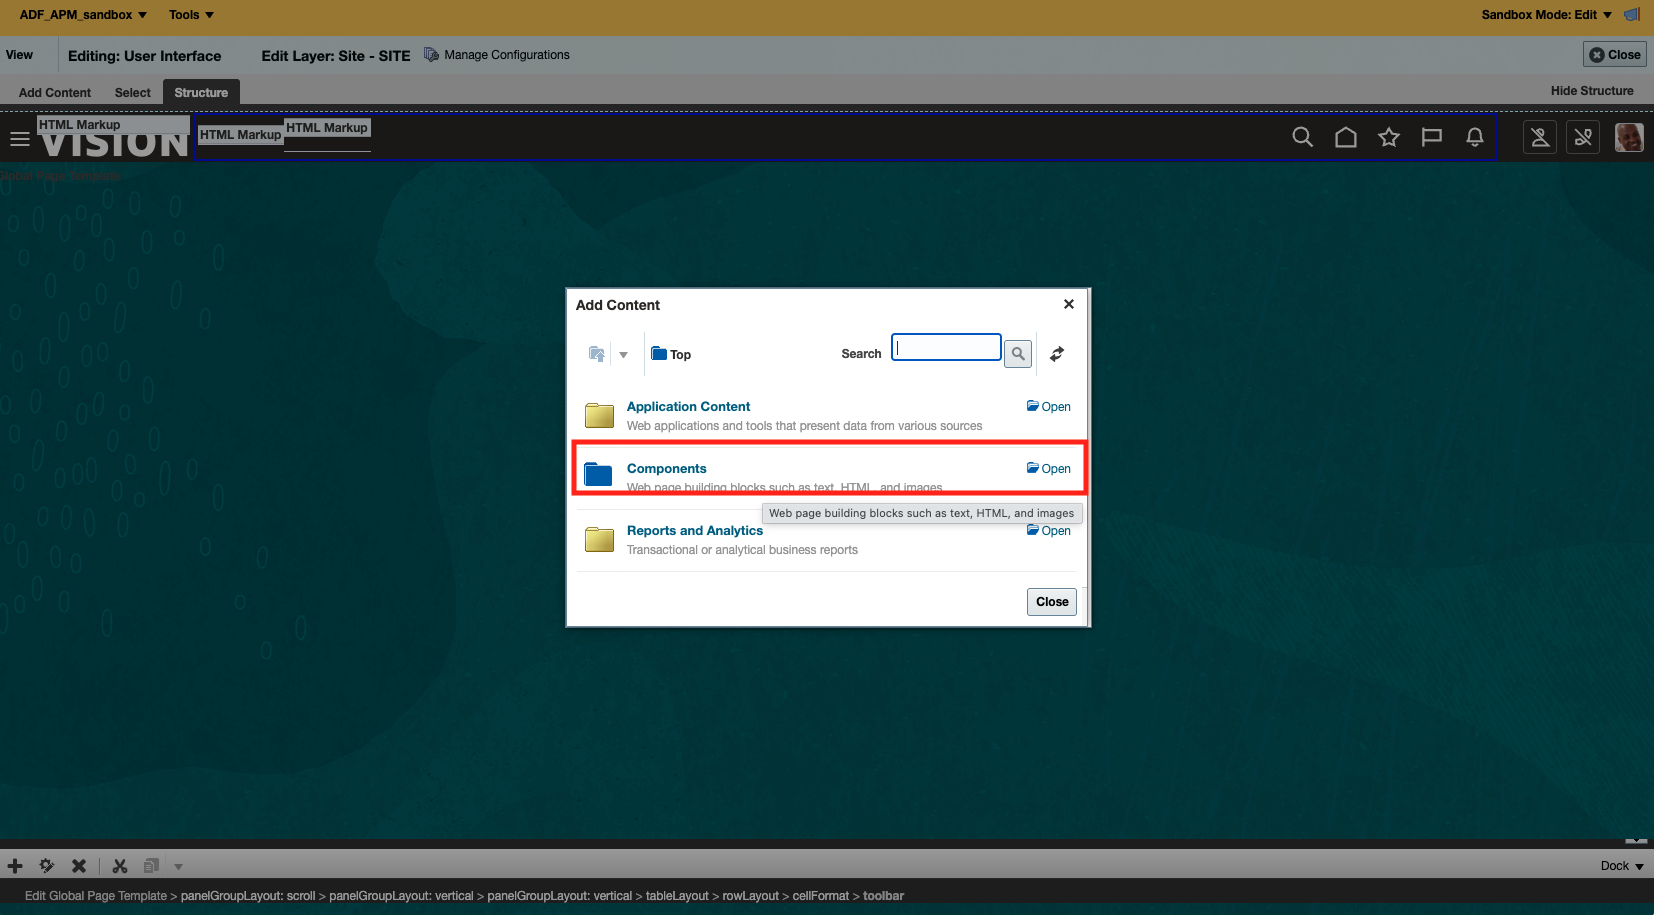 Figure 9: Add Component
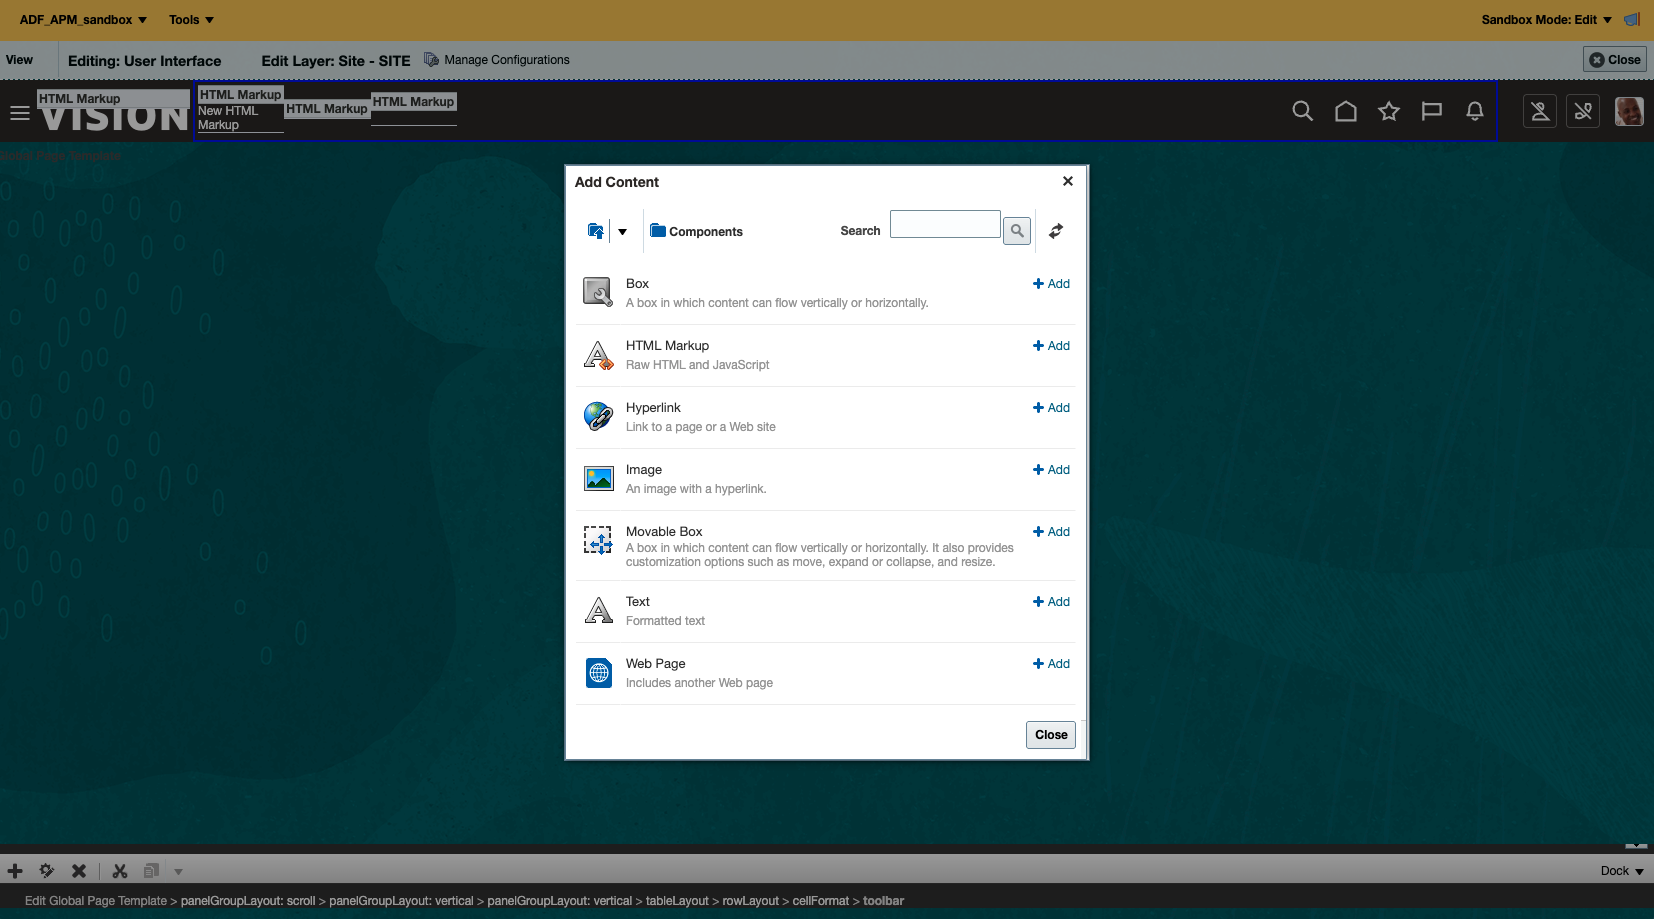 Figure 10: Add Component
- Switch to Add Content tab and click the gear setting button of the HTML Markup component
- Open the Expression by clicking the settings icon
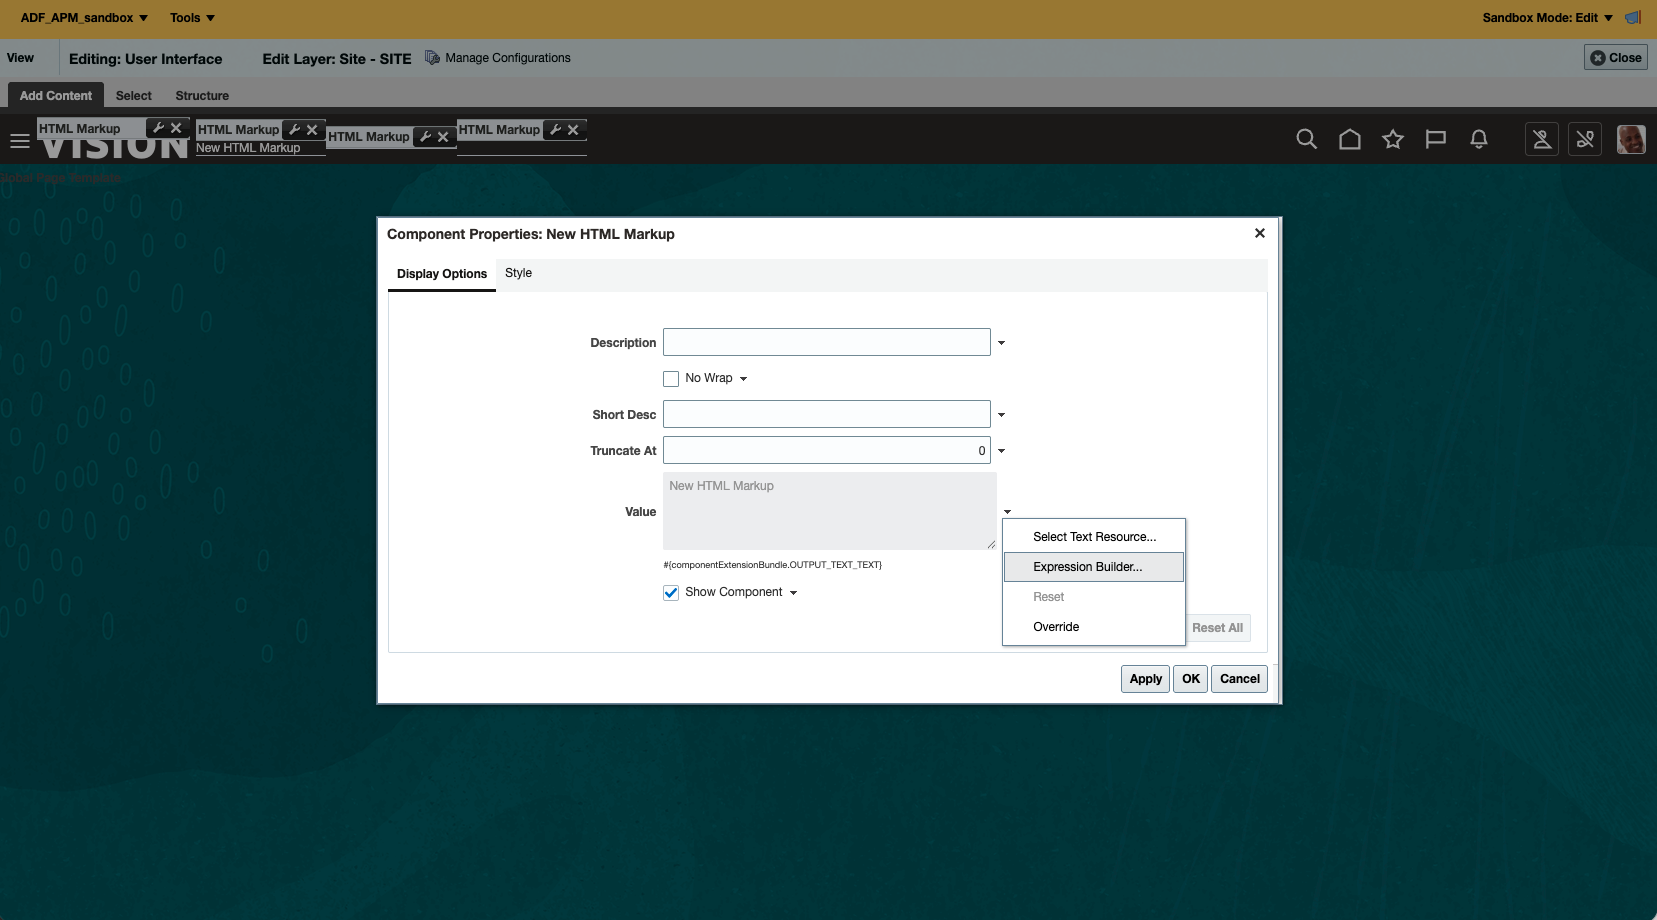 Figure 11: Open Expression
- Click Expression Builder
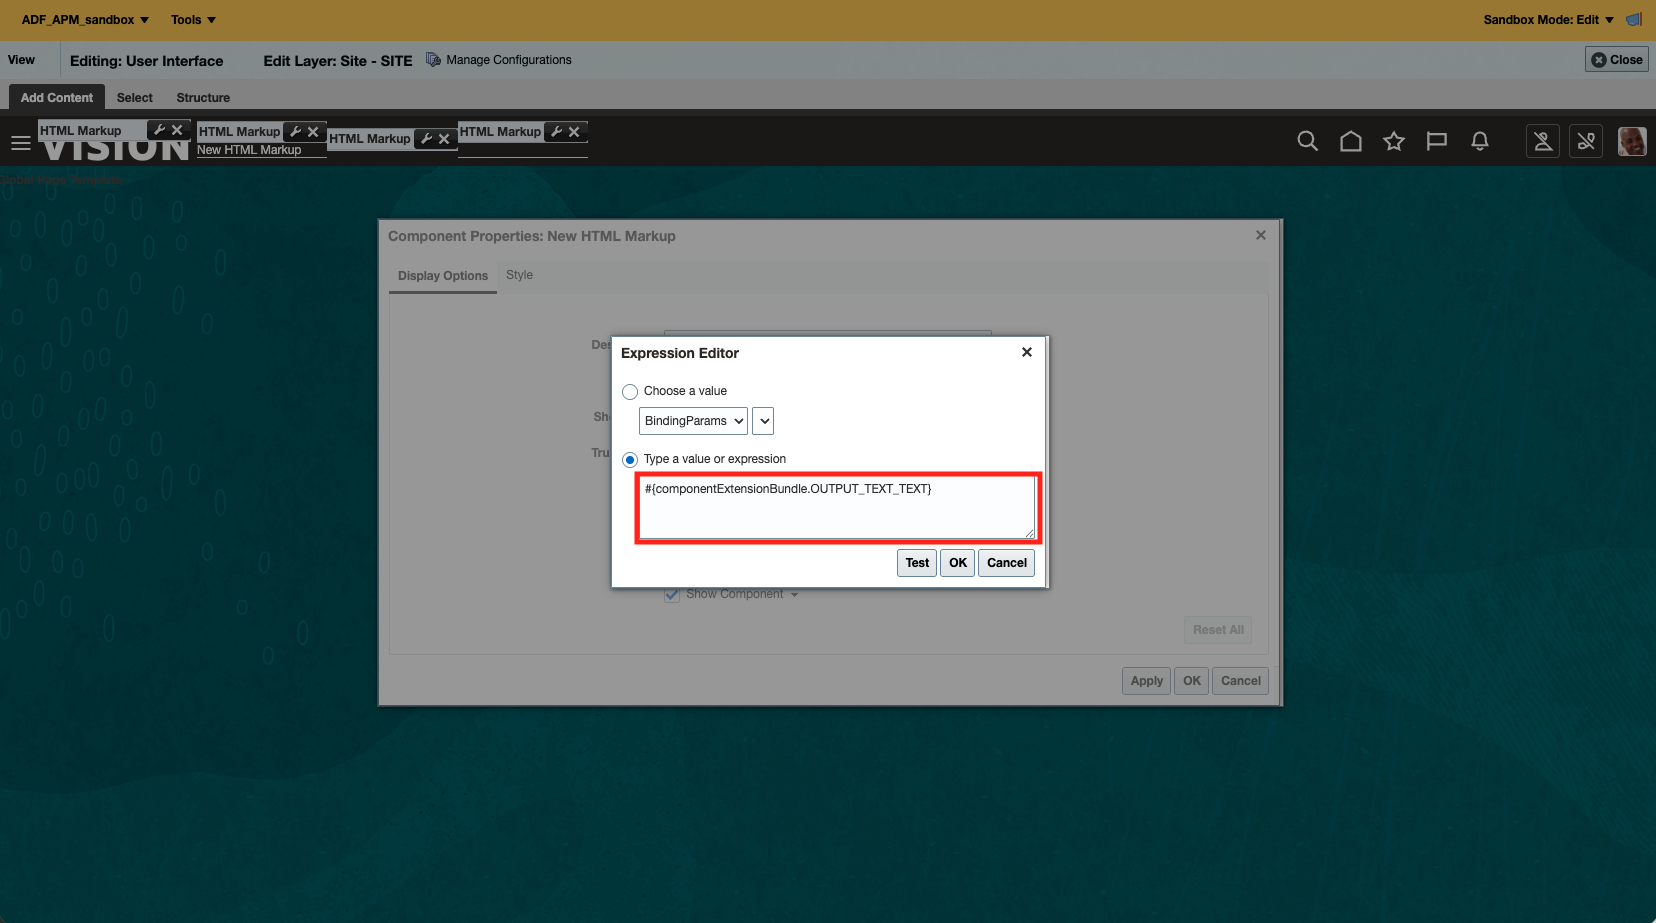 Figure 12: Expression Builder
Step 3: Add APM Browser Agent Script
In the Expression Builder, add the following HTML markup:
<!-- APM RUM Library -->
<!-- Note: static.oracle.com requires maintenance to update the version -->
<!-- Alternative: Use region-specific script if needed -->
<script type="text/javascript" crossorigin="anonymous" src="https://static.oracle.com/cdn/apm/oci/1.1/1.1-1xx/1.1-148/apmrum.fus.base.combi.min.js"></script>

<script type="text/javascript">
function initializeAPMRumConf() {
  const apmRumConfig = document.apmrum || window.apmrum || (document.apmrum = {});
  apmRumConfig.custEP = apmRumConfig.custEP || {};

  /* CUSTOMER SPECIFIC VALUES */
  apmRumConfig.custEP.OracleAPMPublicDataKey = 'YOUR_PUBLIC_DATA_KEY';
  apmRumConfig.custEP.ociDataUploadEndpoint = 'https://YOUR_DOMAIN_ID.apm-agt.us-phoenix-1.oci.oraclecloud.com';
  apmRumConfig.custEP.serviceName = 'Fusion';
  apmRumConfig.custEP.webApplication = 'ADF-Page';
  apmRumConfig.traceSupportingEndpoints = apmRumConfig.traceSupportingEndpoints || [
    { headers: [], hostPattern: '.*' }
  ];

  /* Uncomment the lines below only after the required privacy review. */
  // apmRumConfig.custEP.trackPlainUserId = true;
  // apmRumConfig.trackPlainUserId = true;
  // apmRumConfig.trackScreenText = true;

  /* END OF CUSTOMER SPECIFIC SETTINGS */
  apmRumConfig.confInst = (apmRumConfig.confInst || new Set()).add('custEP');
}
initializeAPMRumConf();
</script>
Configuration Notes:
- Replace
YOUR_PUBLIC_DATA_KEYwith your APM domain’s public data key - Replace
YOUR_DOMAIN_ID.apm-agt.us-phoenix-1.oci.oraclecloud.comwith your actual data upload endpoint - Adjust the region in the endpoint URL to match your APM domain region
- The
webApplicationvalue is set to'ADF-Page'to identify ADF pages in APM - Screen-text collection and plain user-name reporting remain disabled unless you explicitly enable them after the required privacy and security review
User ID Hashing:
- By default, APM hashes user IDs to protect privacy
- To track plain text user IDs (for debugging), uncomment:
apmRumConfig.custEP.trackPlainUserId = true; - Warning: Only enable plain text user IDs if required for troubleshooting and ensure compliance with privacy regulations
Personally Identifiable Information (PII):
- Review APM documentation on Hiding Personally Identifiable Information
- Configure PII masking if your application contains sensitive user data
- Ensure compliance with GDPR, CCPA, and other privacy regulations
Set the Content-Security-Policy Header
The browser must be permitted to load the APM RUM library from the location used in the script. Add either static.oracle.com or your region-specific ingest-rum.apm-agt.<region>.oci.oraclecloud.com host to the applicable ADF Content-Security-Policy ALLOWED_ORIGINS configuration. Preserve any origins that are already configured. The APM data upload endpoint must also be permitted for outbound browser connections. See ADF Faces Configuration and Content Security Policy Error Correction.
Step 4: Publish the Changes
- Click Apply or Save to close the popup
- Click Publish
- Click Yes in the confirmation dialog
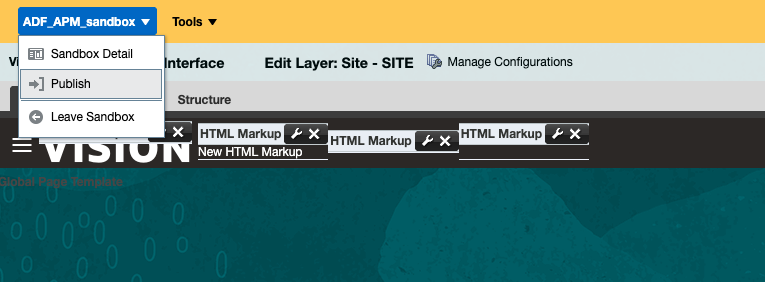 Figure 13: Publish
The APM Browser Agent is now deployed to all ADF pages in your Fusion instance.
Part 2: Adding RUM Agent to Fusion Redwood Pages
Starting from Oracle Fusion Release 26C, the earlier approach of adding JavaScript to the Unified Module in Advanced mode is no longer used. Instead, the Fusion APM RUM Assistant transforms a current Visual Builder workspace export into an importable ZIP, embeds the browser agent and shared APM configuration, and activates the module in the eligible Redwood App UI overrides selected for that extension. The administrator does not need to edit JavaScript or JSON.
Access: To request access to the Fusion APM RUM Assistant, contact your Oracle account team so they can engage the development team, or open a My Oracle Support service request for additional support.
Deployment boundary: Generate and review the ZIP locally, then import it into a non-production Visual Builder workspace first. Treat Preview, RUM upload verification, and publication as separate administrator approval gates. Keep the original workspace export as the rollback artifact.
Step 1: Open the Current Workspace from a Redwood Page
-
Navigate to any Redwood page in your Fusion application. For example, navigate to Me > Journeys, or another Redwood page you know.
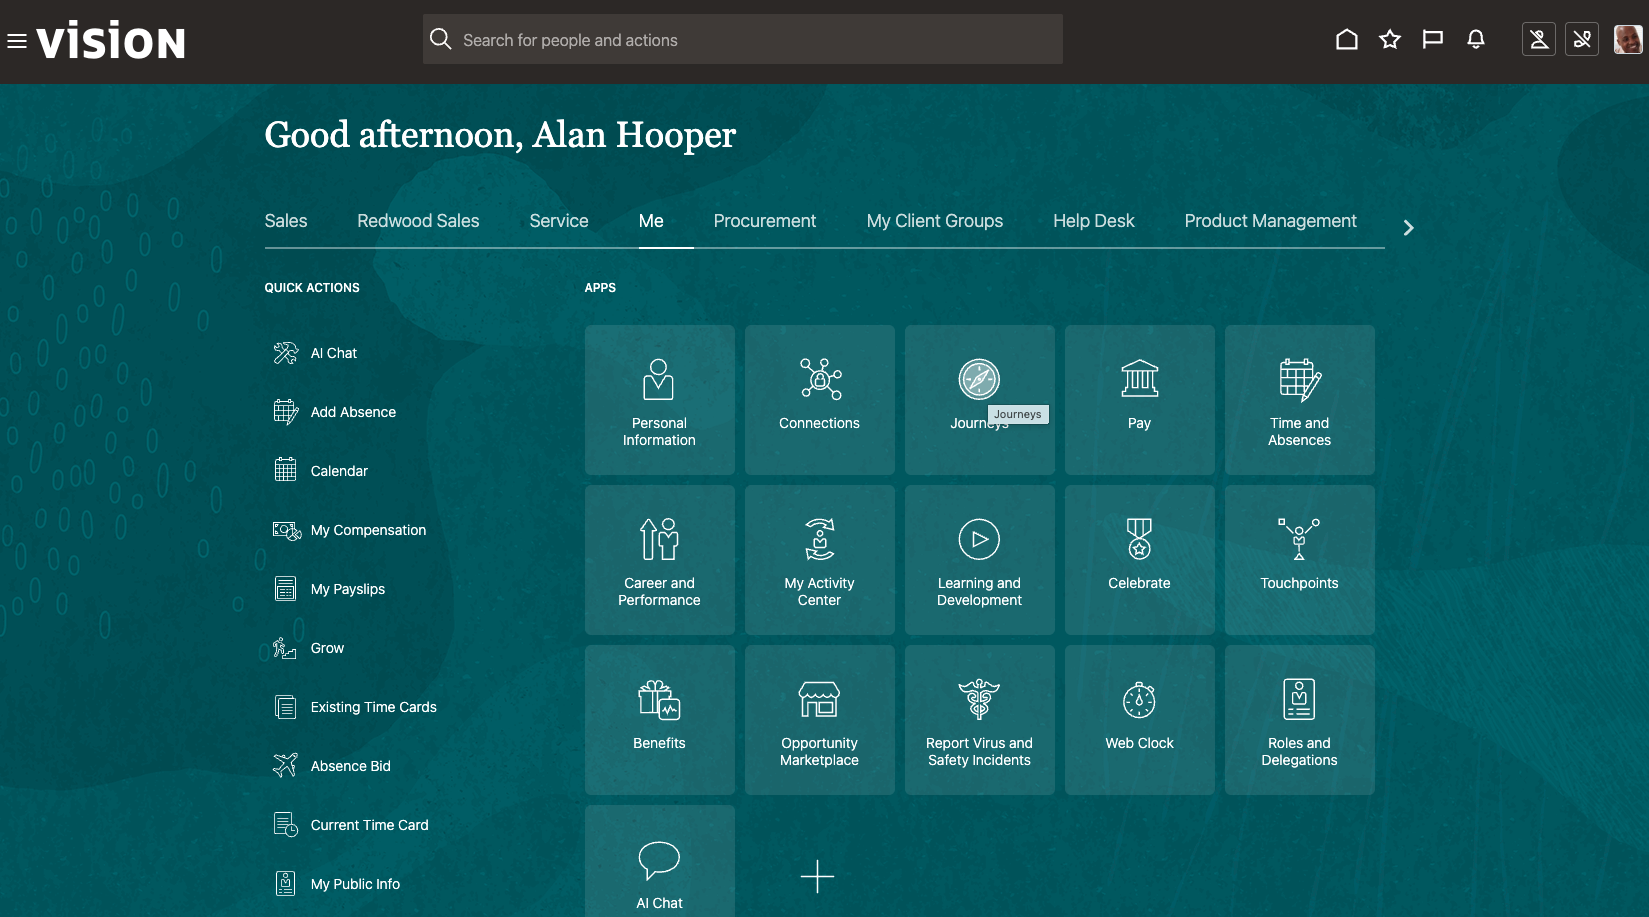 Figure 14: Redwood page
 - Click the Profile icon in the upper-right corner.
-
Select Edit the Page in Visual Builder Studio.
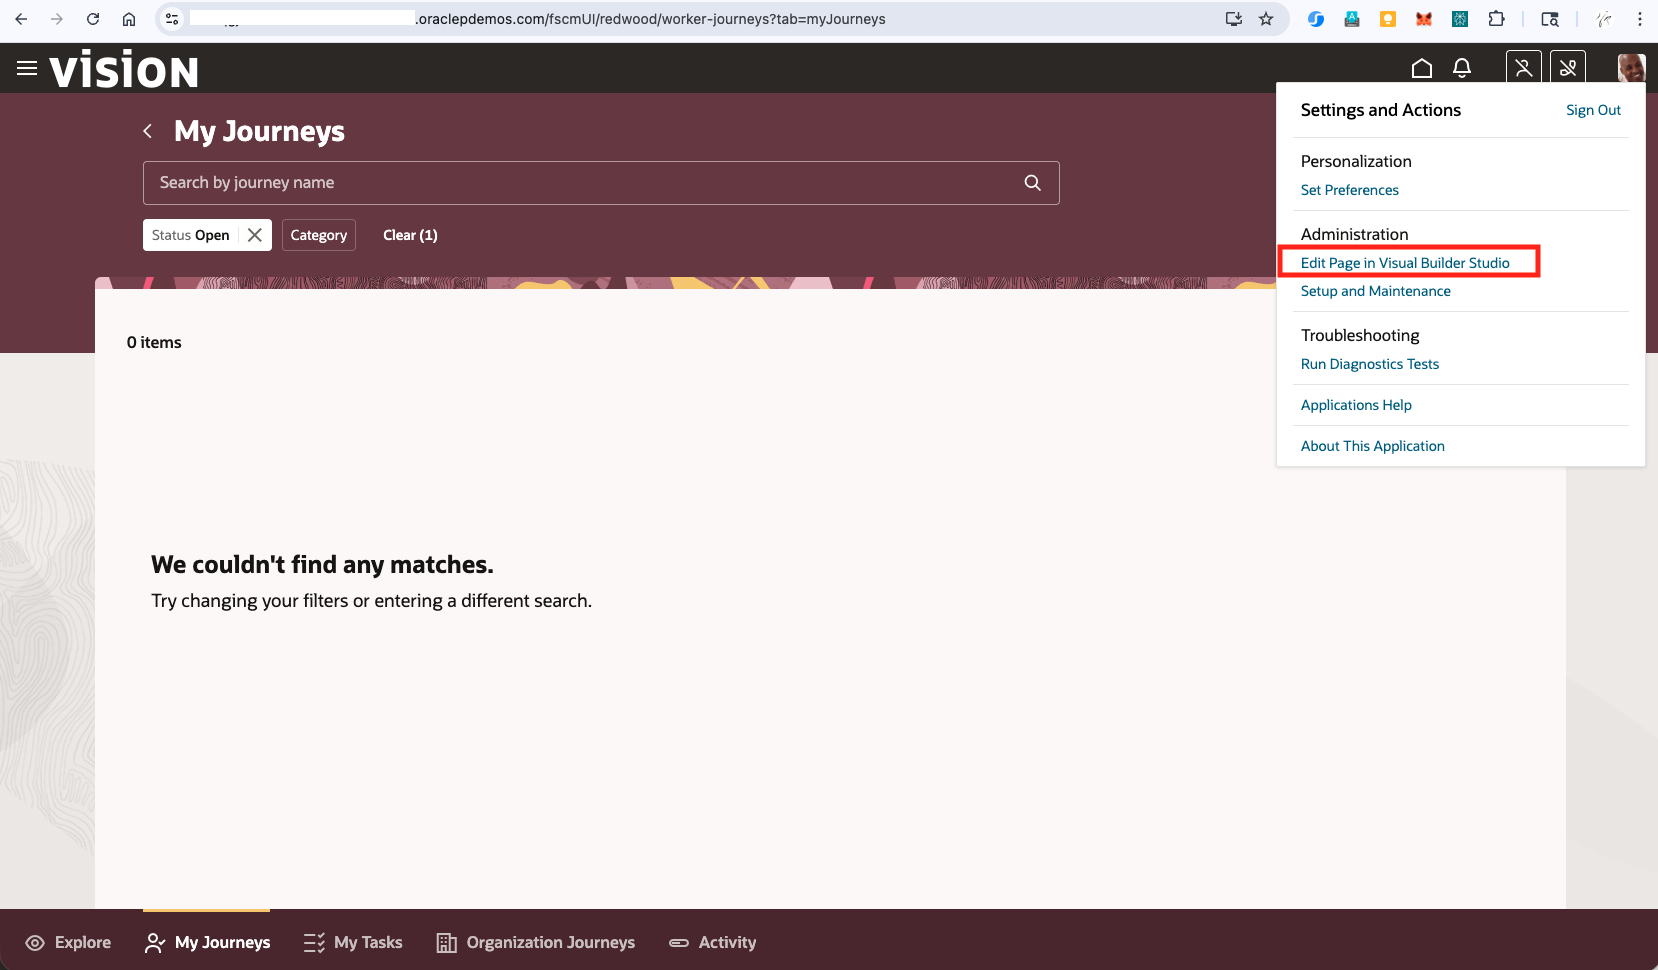 Figure 15: Edit the page in Visual Builder Studio
The first time you access this option, Fusion automatically creates a Git repository for your Oracle Application or App Extension project. This is a one-time activity.
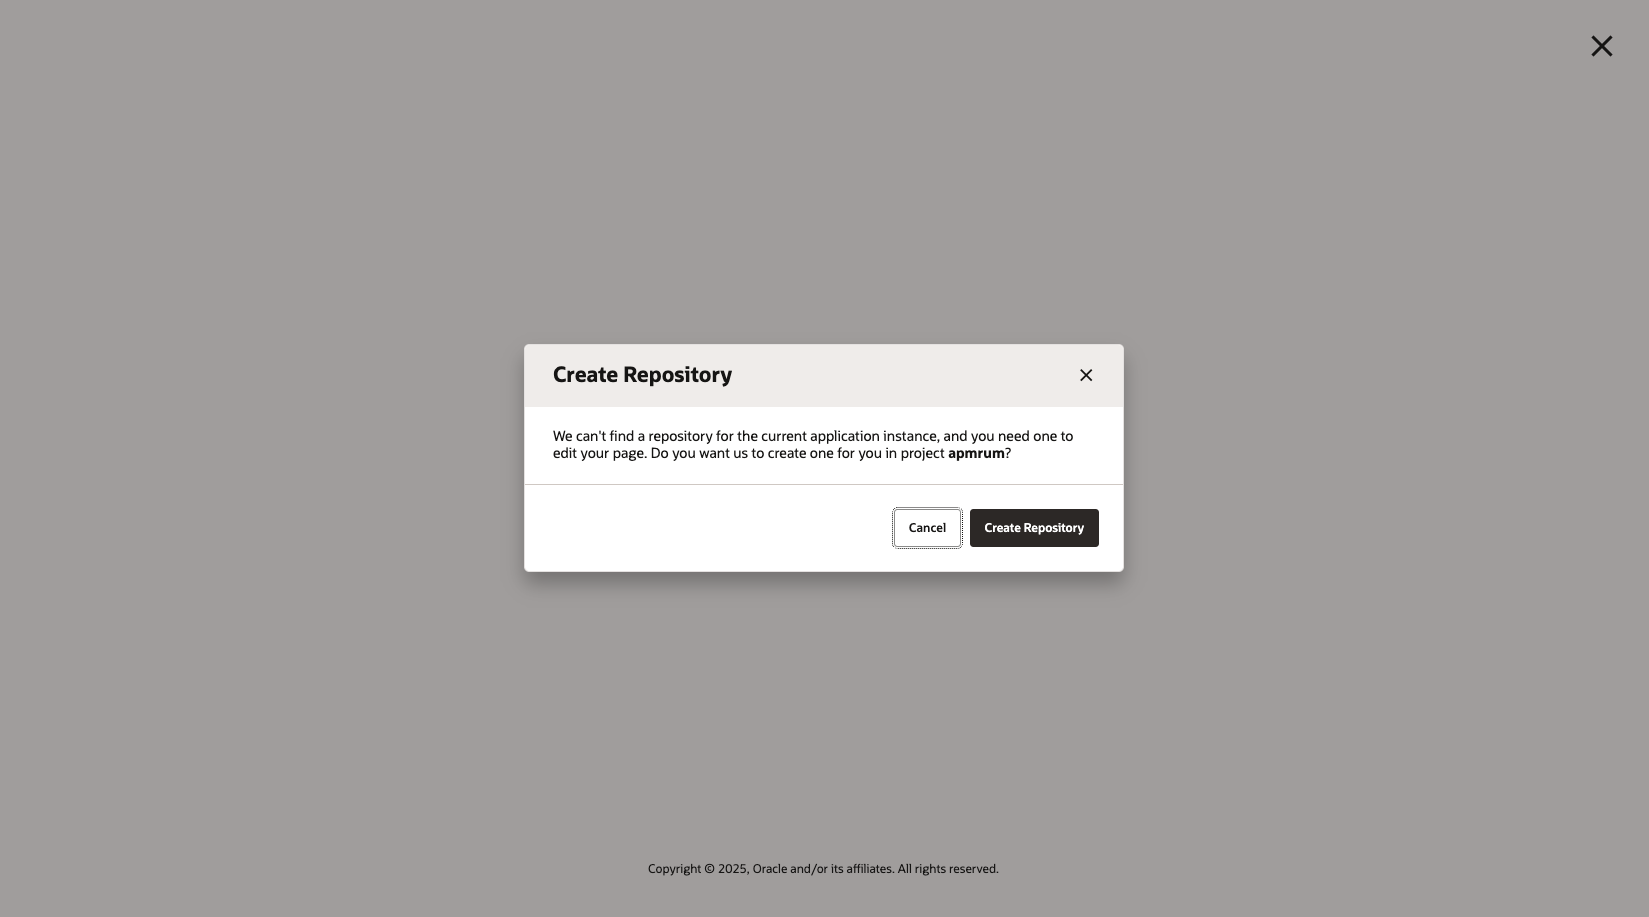 Figure 16: Git repository
Step 2: Export the Current Workspace
-
The project Git repository opens and displays the page template.
 Figure 17: Page template
 -
From the menu in the upper-right corner, select Export. The downloaded archive contains the current files from the workspace branch.
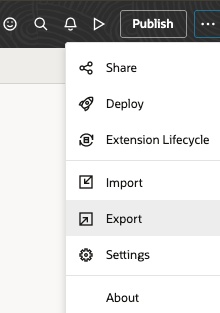 Figure 18: Export and Import are available from the Visual Builder workspace menu
 -
Keep this original ZIP unchanged as the rollback copy. Run the assistant against a copy of this current export, not against an older generated APM ZIP.
For more information, see Export Your Workspace as an Archive.
Step 3: Prepare and Start the Assistant
- Extract
fusion-apm-rum-assistant.zipinto a private working folder. - Copy the Fusion workspace export into the assistant’s
downloadsfolder. - Start the assistant:
- macOS: Double-click Fusion APM RUM Assistant.command.
- Windows: Double-click Fusion APM RUM Assistant.bat.
- If prompted that Python 3 is unavailable, ask your local IT team to install Python 3 and then start the assistant again.
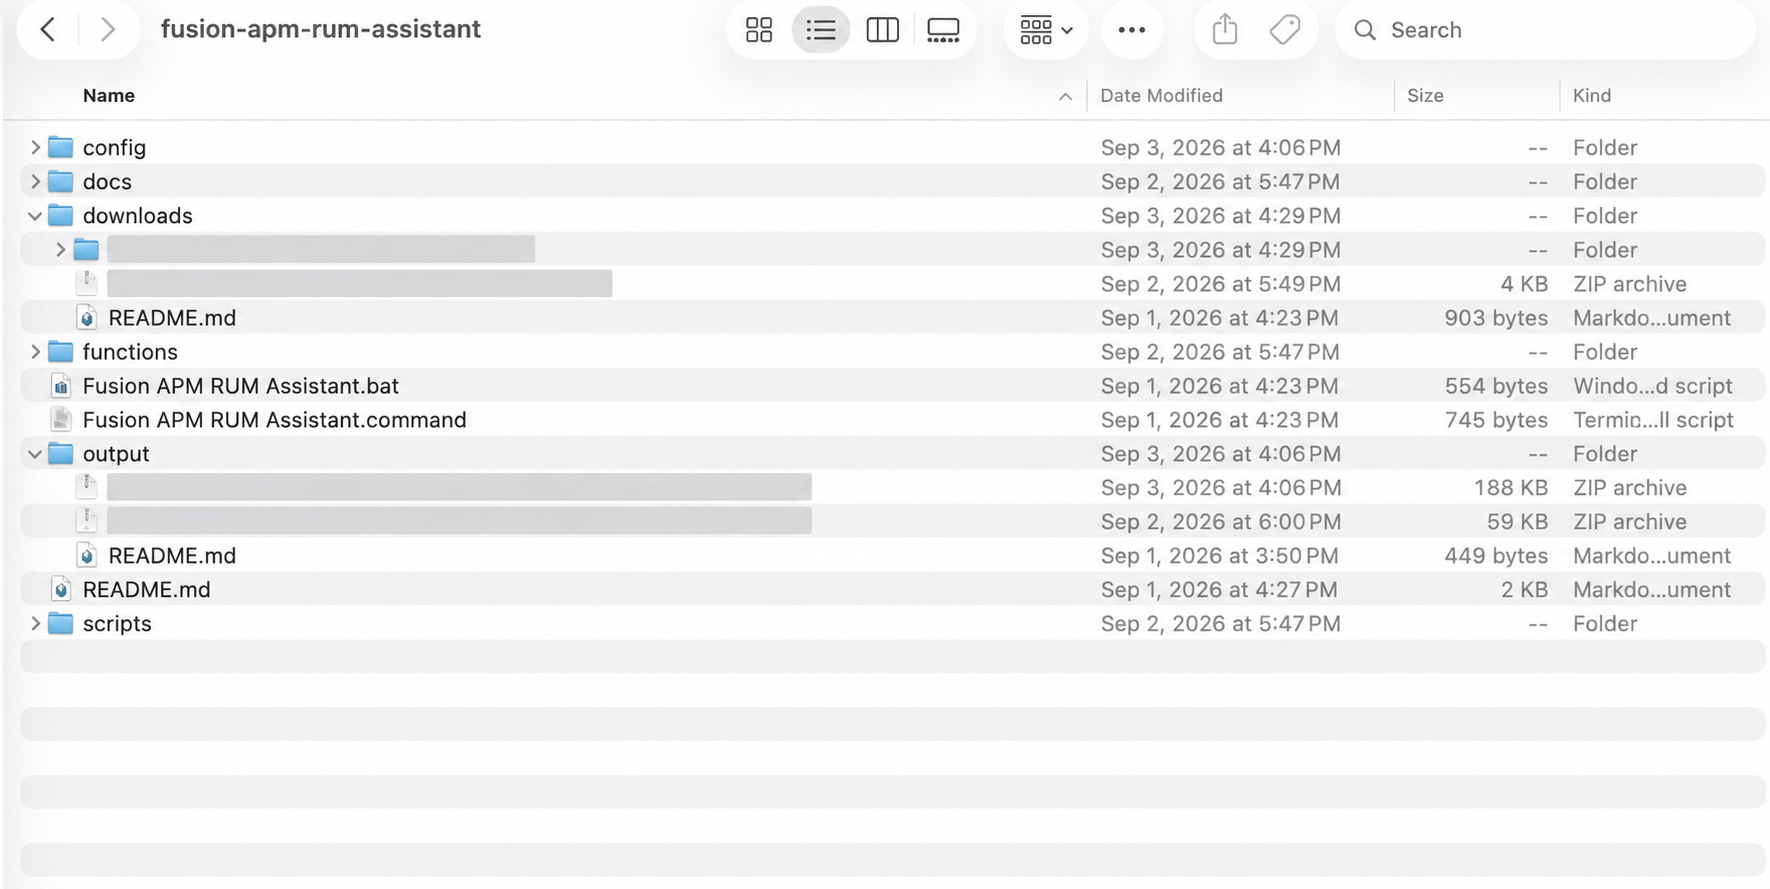 Figure 19: Fusion APM RUM Assistant working folder on macOS; environment-specific archive names are redacted
On the first run, enter the following values from the target OCI APM domain:
- OCI region: The region containing the APM domain. The assistant uses this region to obtain the browser agent while generating the ZIP.
- APM public data key: Found under APM domain details > Data Keys > Public Data Key.
- APM data upload endpoint: Shown in the APM domain details. Copy it directly and confirm that it is the HTTPS
apm-agtendpoint for the intended APM domain and OCI realm; do not substitute a general-purpose HTTPS URL. This assistant version checks the URL format but does not prove that the host belongs to the intended APM domain, so this manual comparison is required.
The local configuration is stored in the extracted assistant folder for reuse. The generated ZIP also contains deployment-specific APM settings, so keep both the working folder and generated ZIP within the approved deployment process. The assistant writes trackScreenText: false and trackPlainUserId: false in its customer configuration. Static inspection of this package also found that the embedded Fusion base library initializes a separate fusBaseConfig.trackPlainUserId value to true. Treat the effective user-name behavior as unresolved until the target APM data confirms that identity is hashed or omitted, and do not publish if plain identifiers appear.
Step 4: Select the Fusion App UI Scope
The assistant asks two scope questions. Both default to No:
- Refresh the stored App UI catalog from Fusion?
- Choose No to use the saved catalog, or when you only want to instrument App UIs already represented in the exported workspace.
- Choose Yes for first-time pillar expansion or after Fusion changes. Enter the Fusion pod host name when prompted. The assistant downloads the pod’s current
app-ui-infocatalog and saves it beside the local APM configuration. - If the pod returns an interactive sign-in page instead of the catalog, download the catalog URL through an authenticated Fusion browser session, save it as
config/app-ui-info.json, and run the assistant again without refreshing it.
- Add all eligible App UIs in one Fusion pillar?
- Choose No to use only the App UIs already present in the export.
- Choose Yes, then enter exactly one pillar:
hcm,cx,erp, orscm. A comma-separated list is not accepted.
Each generated ZIP covers one selected pillar. To instrument another pillar, start from that pillar’s corresponding extension/workspace export and create a separate output; rerunning against the same original export does not combine pillars.
Pillar expansion includes only applications that the catalog explicitly identifies as extensible. In this mode, the assistant deliberately excludes unified-module, creates the selected App UI override directories, merges the required provider dependencies, and applies the shared APM RUM module import. When you choose No for pillar expansion, the assistant applies the import to every App UI directory already present in the export. Because this package version does not remove an existing unified-module directory in that mode, confirm that the source workspace does not contain a unified-module App UI override before proceeding.
If the downloads folder contains several Fusion export ZIPs, select the intended archive from the numbered list.
Review the Generation Summary
Do not import the generated ZIP until the summary matches the intended scope. Review these lines in particular:
- Extension and Manifest: Confirm the expected application extension and export format.
- Expansion pillar: Confirm the one intended business pillar.
- Catalog applications selected: Confirm that eligible App UIs were found.
- Applications created and Applications updated: At least one of these values must be greater than zero. If both are zero, the ZIP contains APM resources but does not activate RUM in any App UI; correct the export or select the confirmed pillar and rerun the assistant.
- Created: Record the exact output ZIP that will be imported.
In one validated HCM packaging run, the current pod catalog contained 199 HCM applications: 174 were marked extensible and added, 25 were skipped, 93 provider dependencies were added, and unified-module was excluded. These counts describe that pod and release only; expect them to change across Fusion environments and updates.
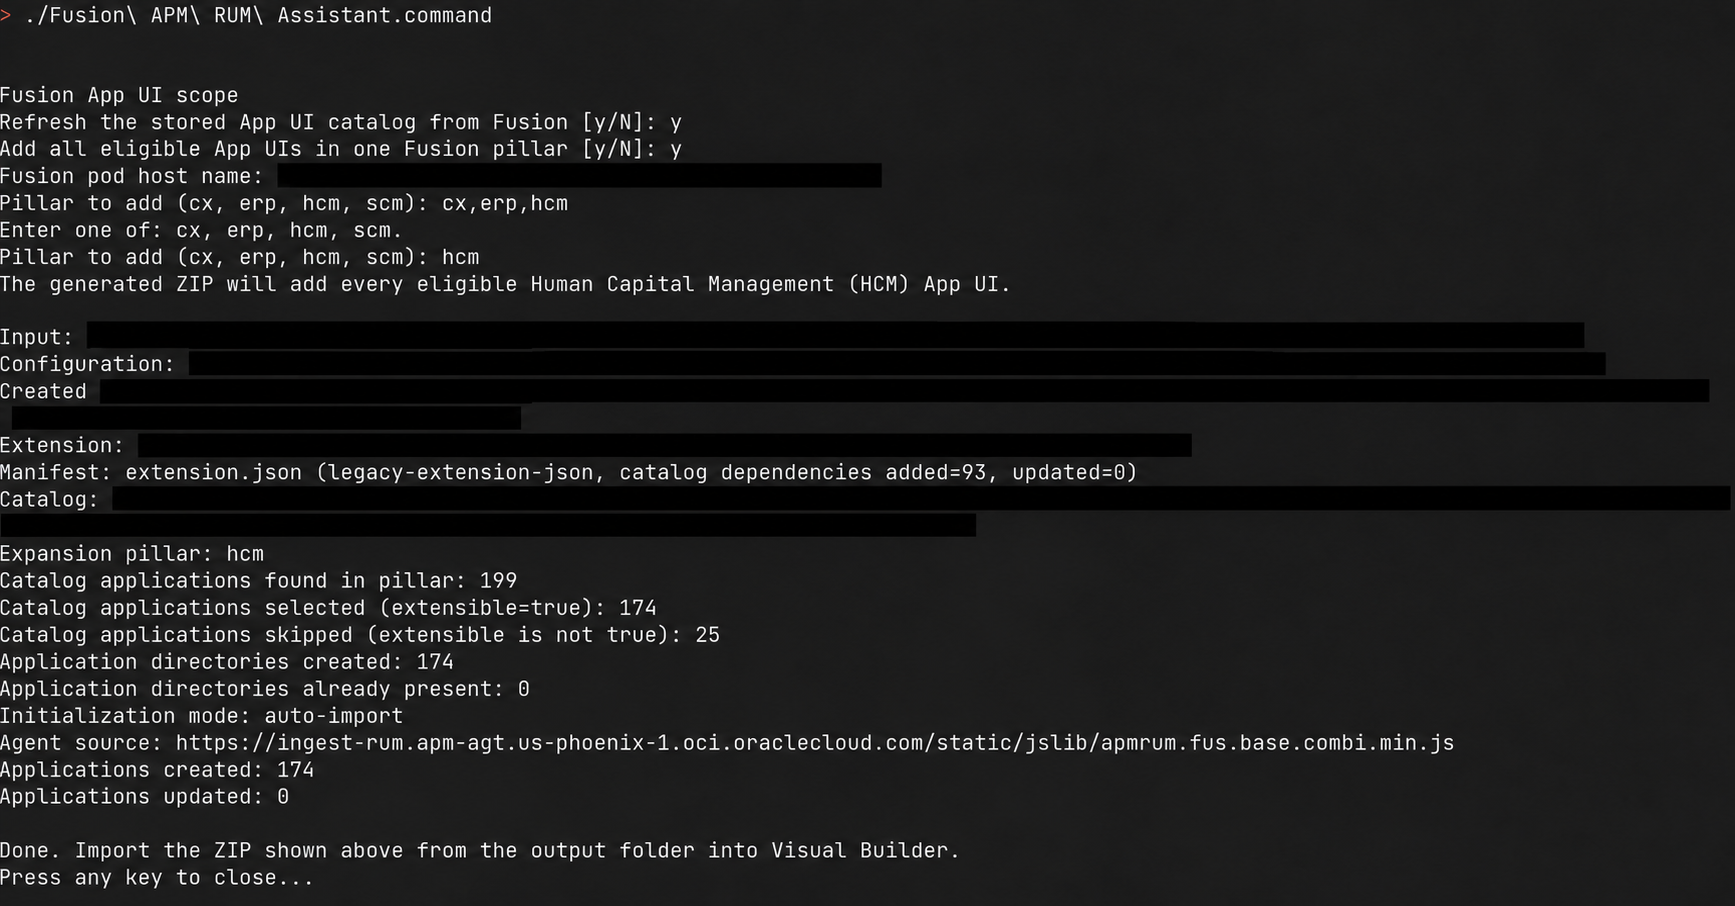 Figure 20: Successful HCM pillar-expansion packaging summary; environment-specific identifiers and local paths are redacted
Validation scope: This result validates local macOS packaging and the structure of that generated HCM ZIP. It does not by itself validate Windows execution, Visual Builder import or build, live RUM delivery, privacy behavior, or CSP. Complete the non-production checks in Step 5 before publishing. The displayed Agent source is the packaging-time download source; the generated extension embeds that library for runtime use.
Step 5: Import, Preview, Verify, and Publish
- Return to the same Visual Builder workspace used for the export.
- Confirm that no one has changed the workspace since the source export was created. If it has changed, export a fresh rollback ZIP, rerun the assistant against that archive, and review the new output before importing.
- From the upper-right menu, select Import and choose the
*-with-apm-rum.zipfile from the assistant’soutputfolder. -
When replacing the workspace from this complete generated export, select Delete existing files and resources to prevent duplication, then click Import. See Import Resources to Your Workspace.
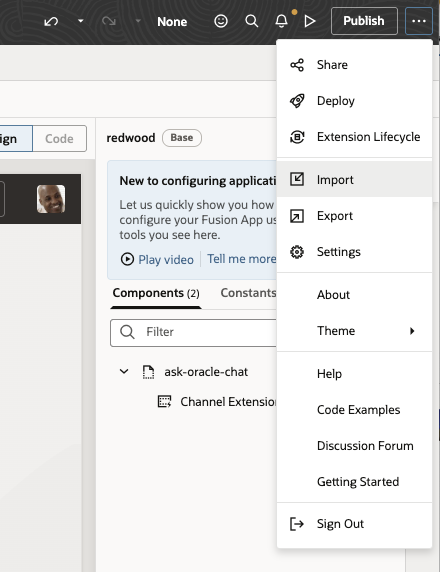 Figure 21: Import the generated APM RUM ZIP
 - Review the import result and build messages. A large pillar-wide extension can require additional processing time; the published Fusion runtime remains unchanged until you select Publish.
-
Preview representative Redwood user workflows in the selected App UIs to generate RUM activity. Do not publish yet.
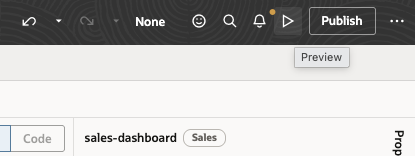 Figure 22: Preview a representative Redwood user workflow before publishing
 -
Wait 5–10 minutes, then open the browser Developer Tools Network tab. Filter for
apm, or more narrowly forobservations/public-span, and confirm that the APM data upload endpoint returns HTTP200or204.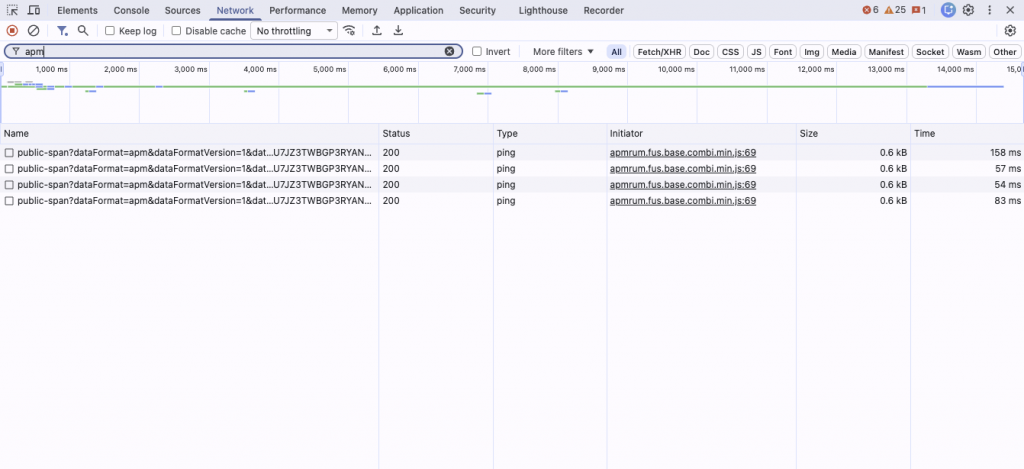 Figure 23: Verify the APM upload response in the browser Network tab
 - In the intended APM domain, confirm the new activity in Trace Explorer or the Real User Monitoring dashboard. Verify the expected
ServiceNameandWebApplication, and confirm that privacy-sensitive values are not reported. - Click Publish only after the preview and APM checks succeed. This deploys the changes to the eligible Redwood App UIs included in the imported extension.
The generated extension embeds the browser-agent library in its APM module. At runtime, the App UI should therefore not fetch the library from static.oracle.com or an ingest-rum host. The browser still uploads RUM observations to the configured APM data upload endpoint, which must be allowed by the application’s Content-Security-Policy connect-src rules. A CSP error in the browser console or a missing 200/204 upload response indicates that the connection policy or network path still needs attention.
If validation fails, do not publish. Retain the assistant configuration, catalog, source export, generated ZIP, and validation result as the deployment record; use the untouched source export to restore the workspace if rollback is required.
Part 3: Configure APM Domain Enrichment Rules
For complete Fusion coverage, enable the Oracle-provided Fusion (FUS) span rule to add Fusion-specific attributes and dimensions to your traces.
Enable Fusion Enrichment Rule
- Navigate to your OCI APM Domain
- Go to Administration > Span Rules
- Click Create Span Enrichment
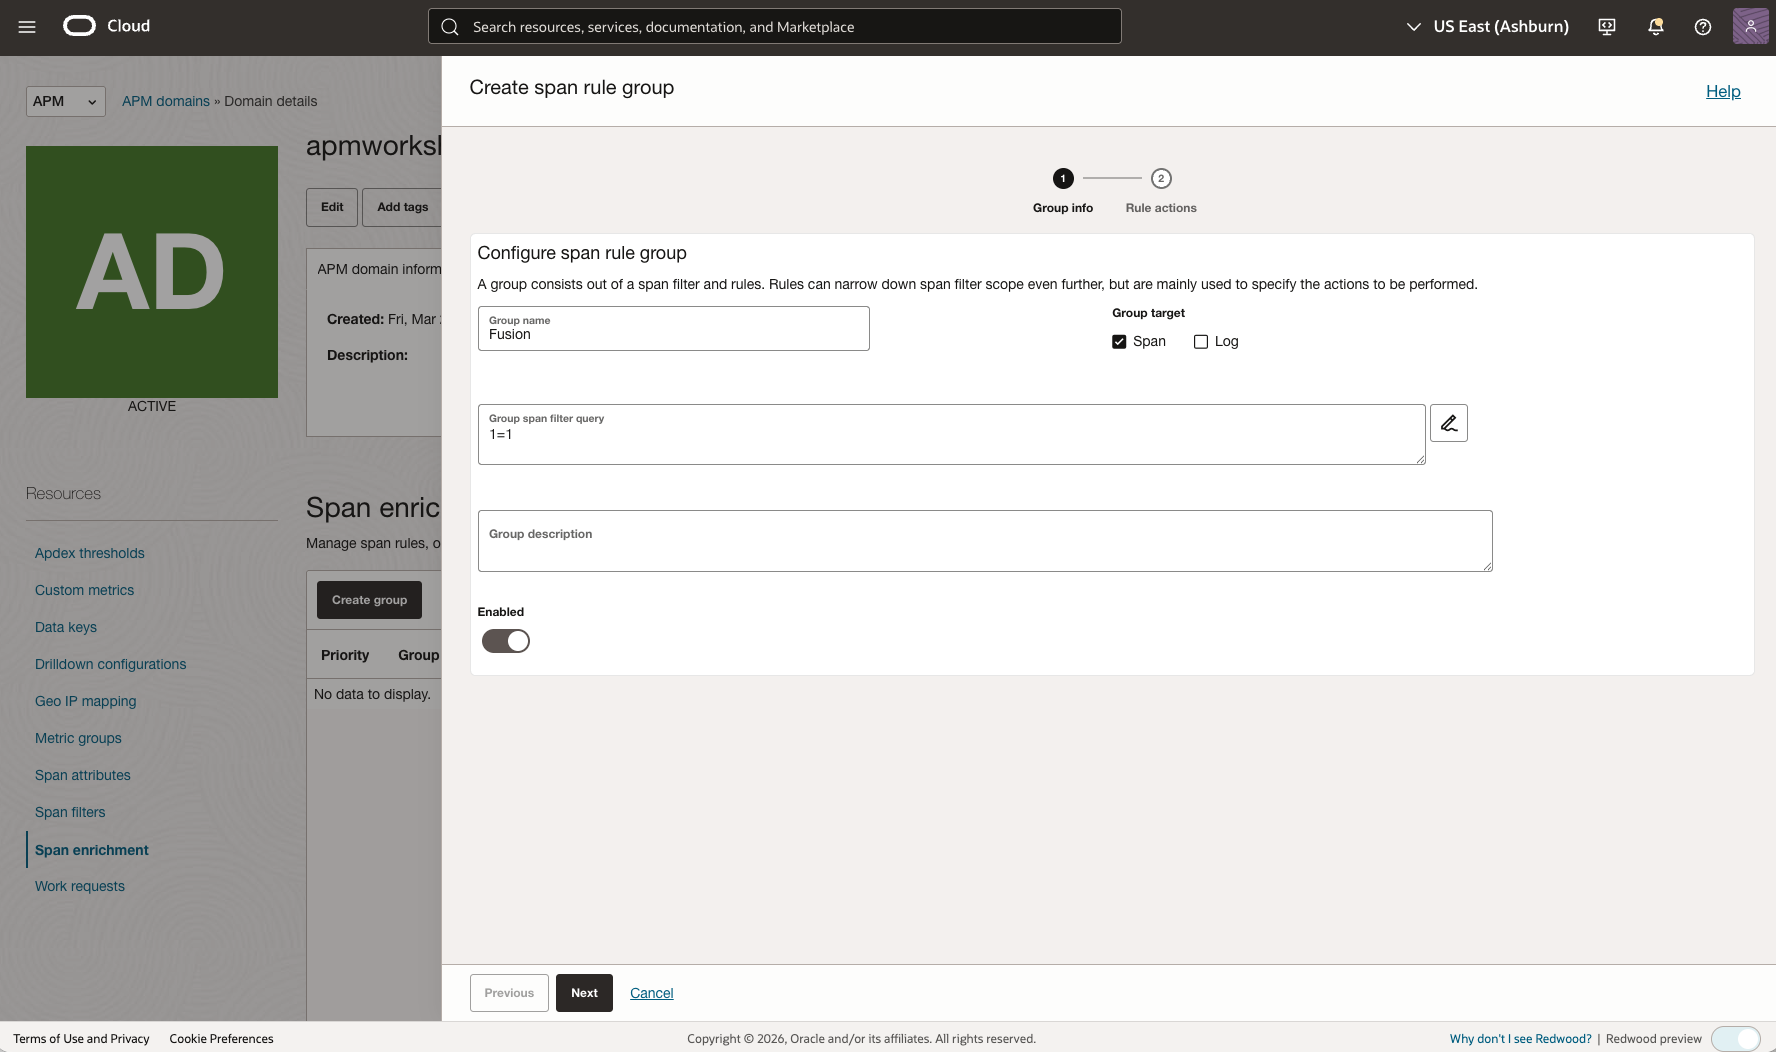 Figure 24: Create Span Enrichment
- Select Oracle Provided span rules
- Find and add the “FUS” rule
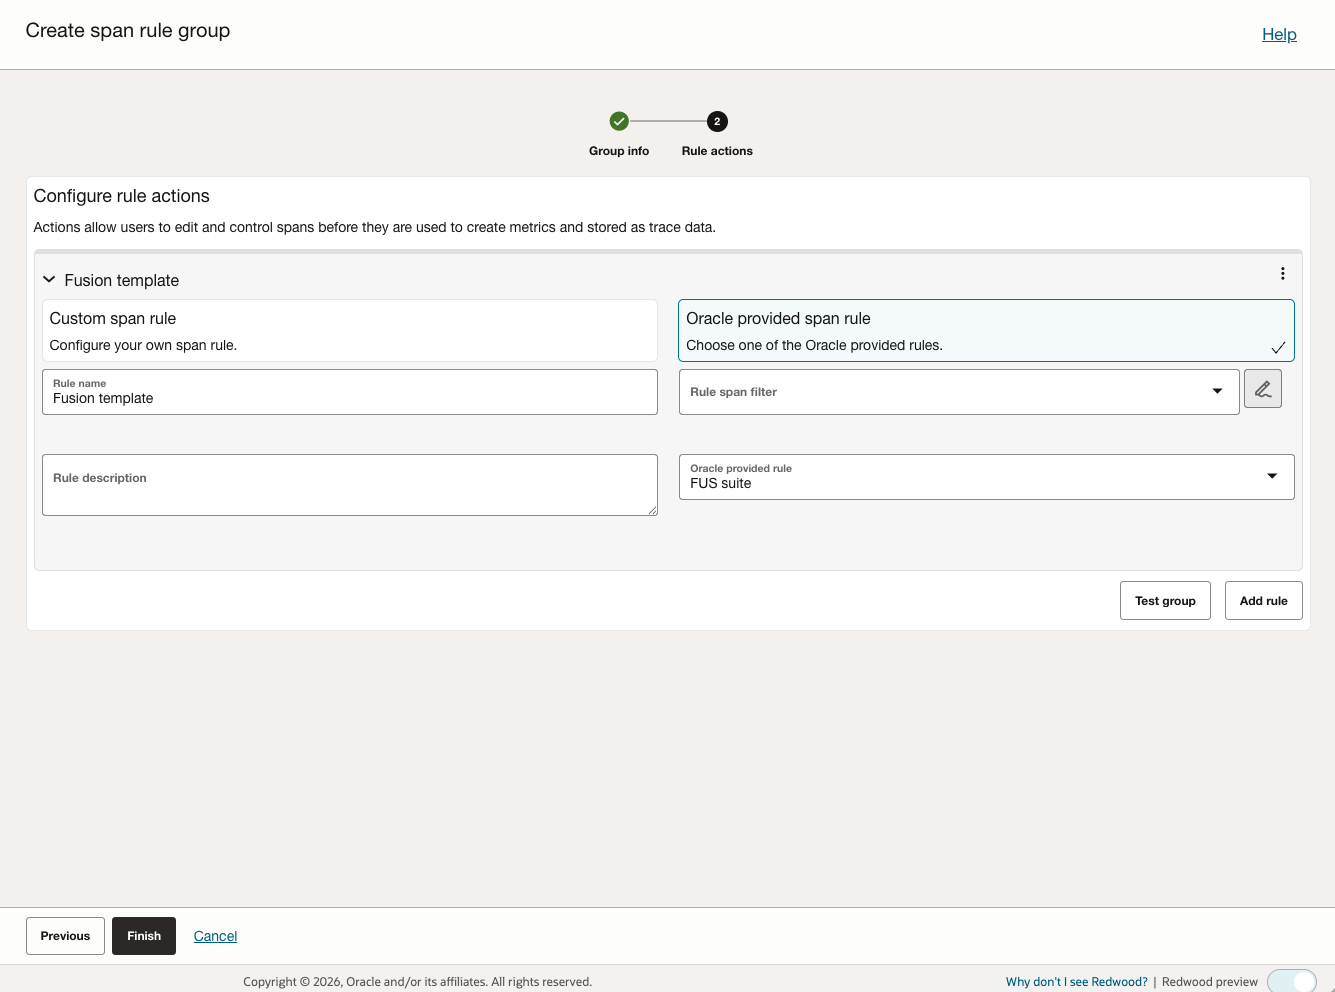 Figure 25: Add Span Enrichment Rule
This enrichment rule creates the following Fusion-specific attributes:
- RwApplication: Identifies the Redwood application
- RwPath: Captures the Redwood page path
- RwContainer: Identifies the Redwood container
- FusFamily: Describes the Fusion area where activity occurred (e.g., HCM, ERP, SCM, CX)
These attributes enable powerful filtering and analysis capabilities in APM Trace Explorer and Metrics Explorer.
Part 4: Verify Application Performance Monitoring Browser Agent Deployment
To generate some monitoring data and verify the setup, use the application you are configuring:
- Generate Data: Use the application you are setting up the monitoring for to generate initial monitoring data.
- View in APM: Go to the APM Trace explorer page to see the data loaded. For example, see APM screenshots below.
- Check privacy settings: For ADF, leave the plain-user-name and screen-text lines commented unless their use has completed privacy and security review. For Redwood, do not infer the effective setting from the generated customer configuration alone because the embedded Fusion base library has its own user-name setting. Confirm that the resulting APM data does not expose plain user names or screen text before publishing.
If needed, verify that the APM data upload url (window.apmrum.ociDataUploadEndpoint) is reachable by doing the following:
- Go to your application and use the Developer Tools in your browser to go to the Developer console. In most browsers, you can start the Developer Console by pressing the F12 key.
- Select the Network tab and filter the URL list by
observations/public-span, if required. -
The Collector URL should be displayed with the 200 or 204 HTTP response code. If you do not see a 200 or 204 HTTP response code, then the browser is not able to access the Collector URL.
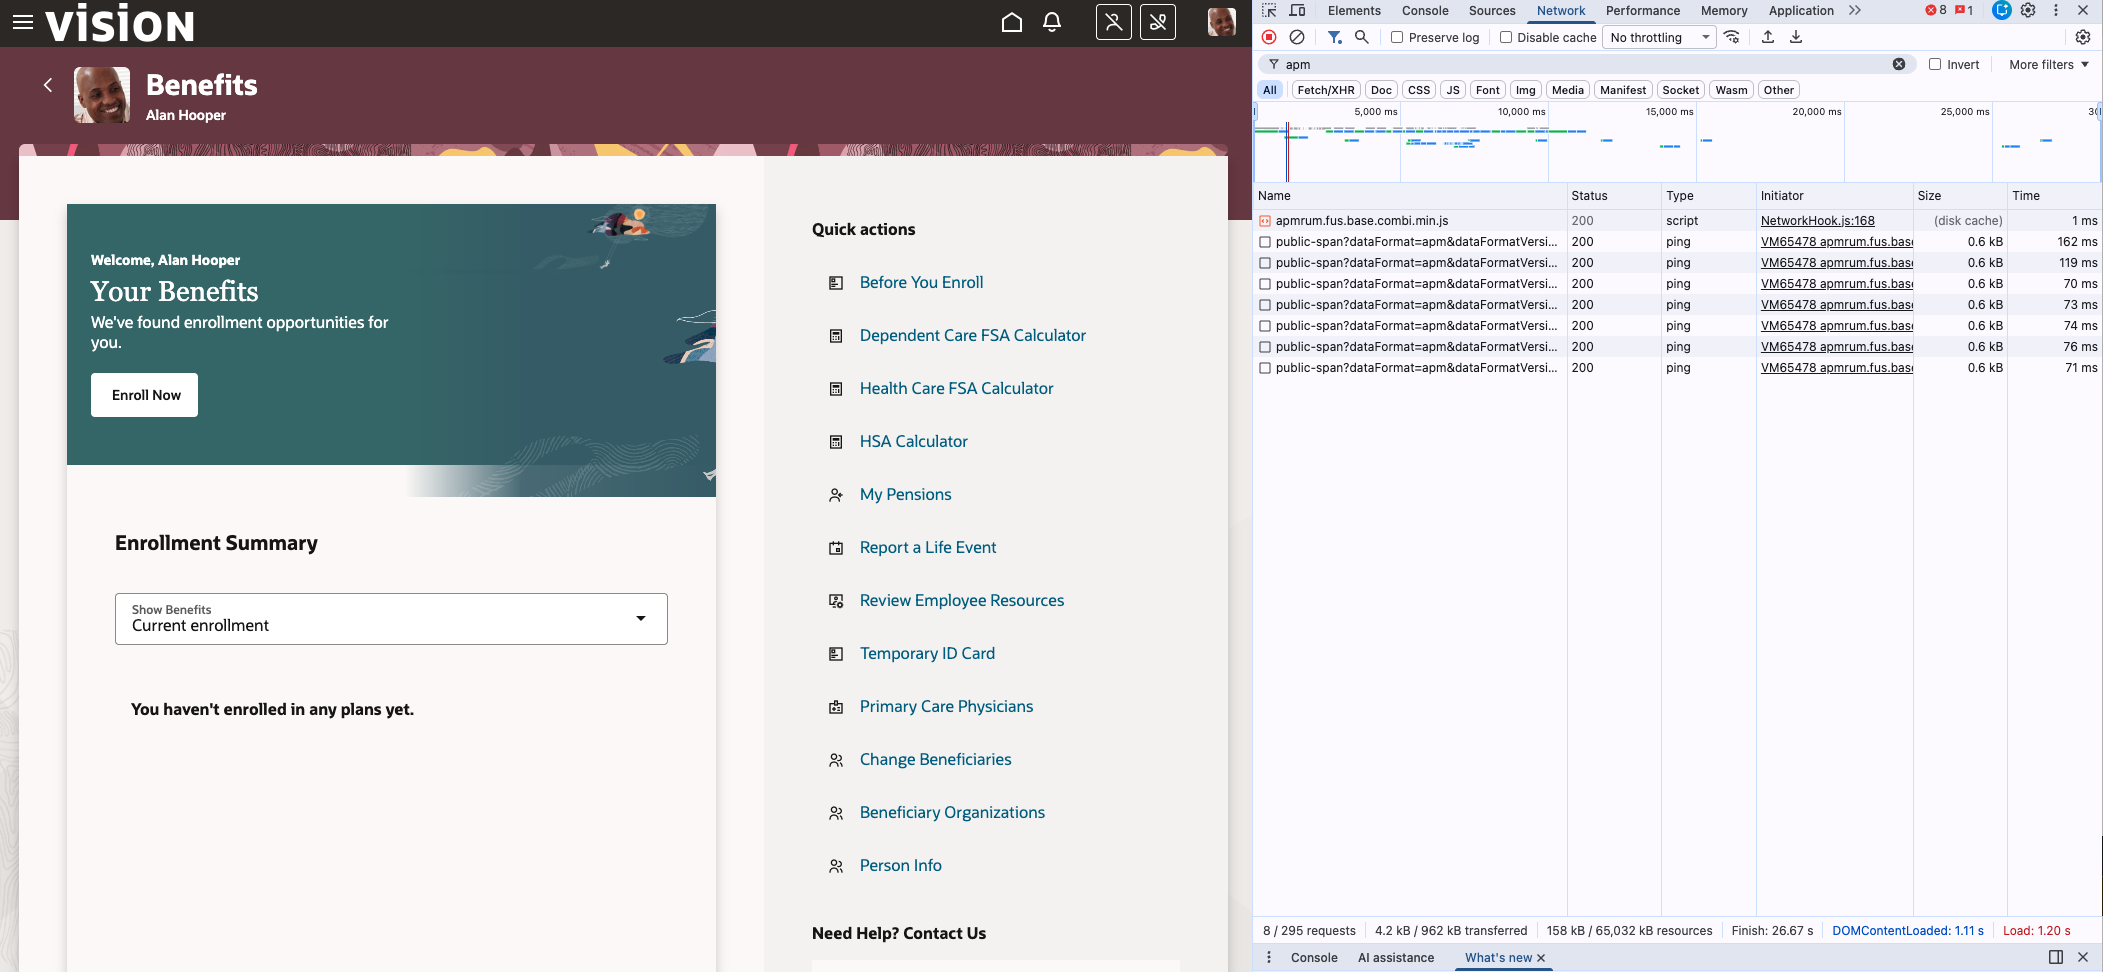 Figure 26: Network Tab
Utilize the APM Real User Monitoring Dashboard to monitor user behavior and application performance
OCI Application Performance Monitoring provides an out-of-the-box Real User Monitoring (RUM) Dashboard that offers immediate, high-level visibility into your Fusion Cloud Apps performance without requiring any custom queries.
To access the RUM Dashboard:
- Navigate to Observability & Management in the Oracle Cloud Console.
- Navigate to Application Performance Monitoring, and click Real User Monitoring.
- Use the global filters at the top to select your compartment, APM domain, Web Application and the desired time frame.
The RUM Dashboard visualizes critical performance metrics across several key dimensions automatically:
- Apdex Score: Monitor the overall satisfaction of your users in a single aggregate performance score.
- Page Performance: Track the exact, real-world time it takes for your Redwood and ADF pages to render for users.
- Page Views & Sessions: View user engagement trends and active sessions over time to understand peak traffic periods.
- Geographic Breakdown: Visually analyze which regions and countries your users are connecting from, and identify location-specific performance latency.
- Client & Browser Breakdown: Understand the device types, operating systems, and browsers your users depend on to access Fusion.
- Top Slowest Pages: Instantly pinpoint the specific Fusion pages currently exhibiting the poorest performance to prioritize code and network optimizations.
This built-in dashboard serves as an excellent starting point for everyday monitoring, performance reporting, and quickly diagnosing macro-level user experience issues without ever looking at the raw telemetry data.
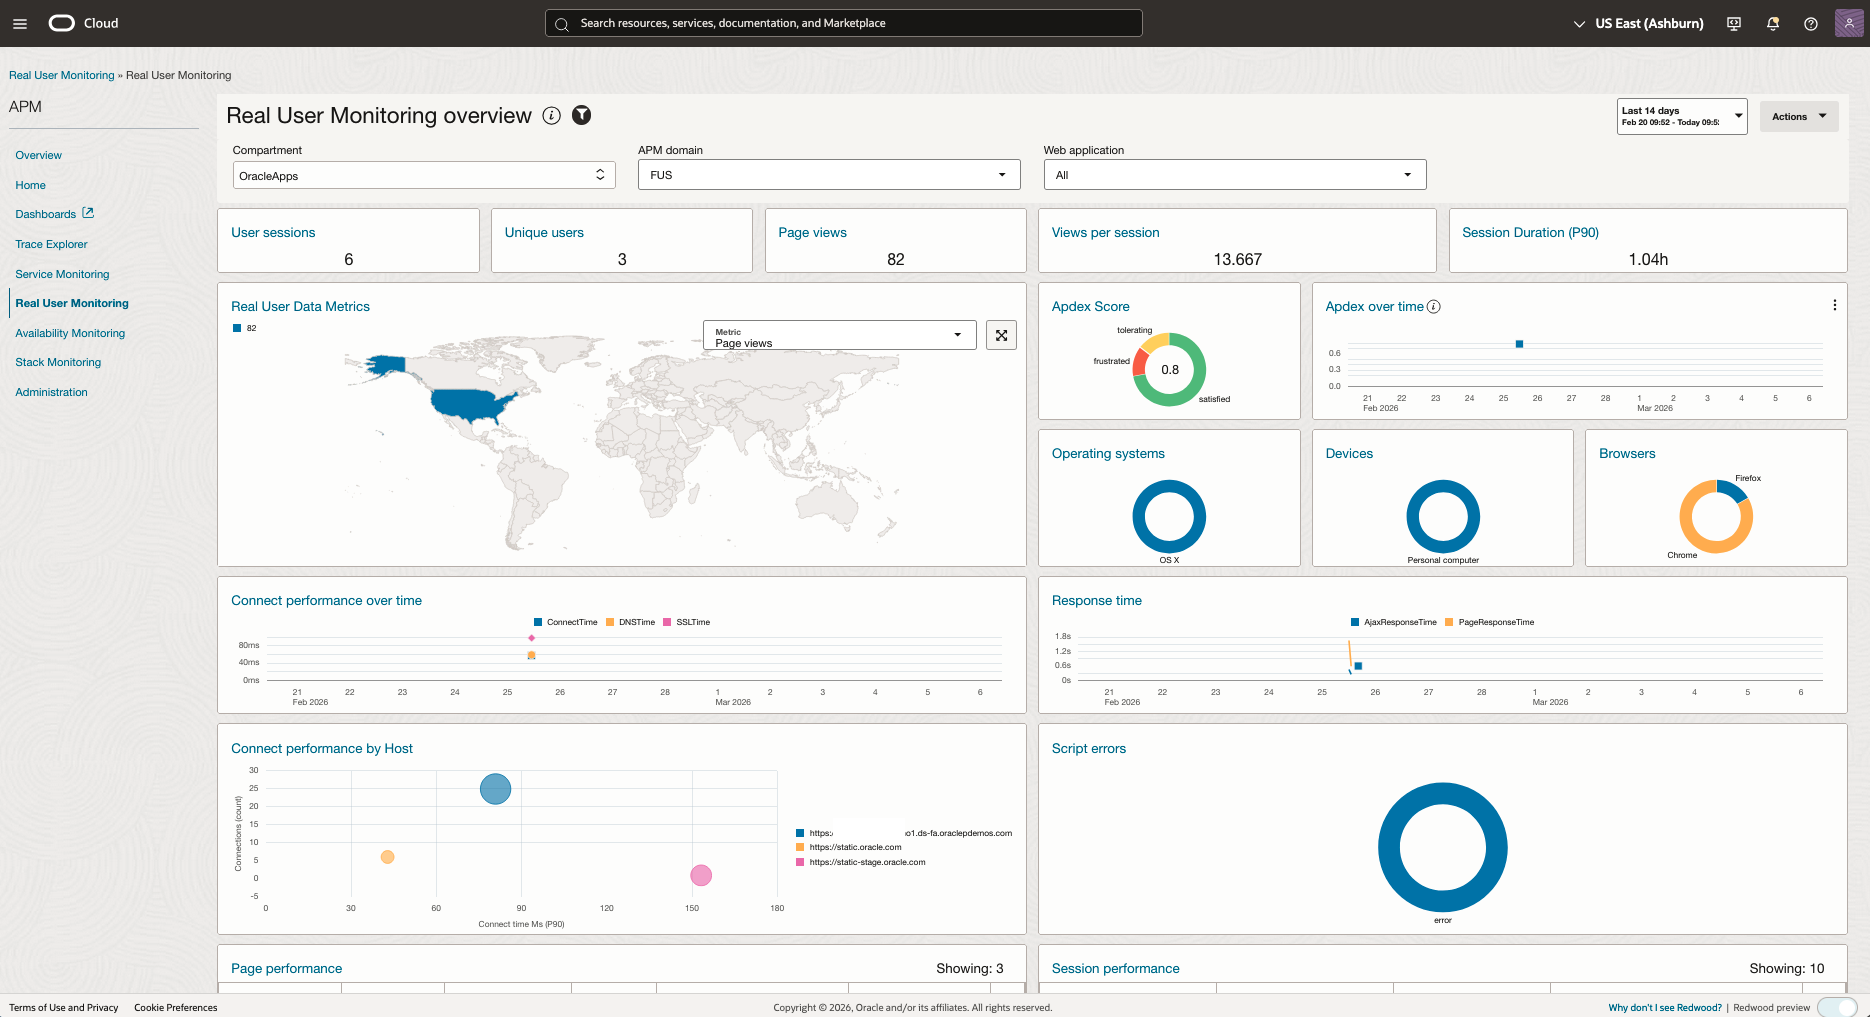 Figure 27: RUM Dashboard
Gain additional insights from RUM Data
Once the APM Browser Agent is deployed and the Fusion span enrichment rules are configured, you can leverage the newly populated attributes (such as RwApplication, RwContainer, RwPath, FusFamily, FusProductCode, FusComponentType, etc.) to gain deeper, custom insights from your RUM data across various use cases:
Use Case 1: Fusion Cloud Apps Pages Clicks by User
Understand which Fusion pages users access most frequently and identify user navigation patterns.
For Redwood Pages:
show spans * group by RwApplication,RwContainer,RwPath
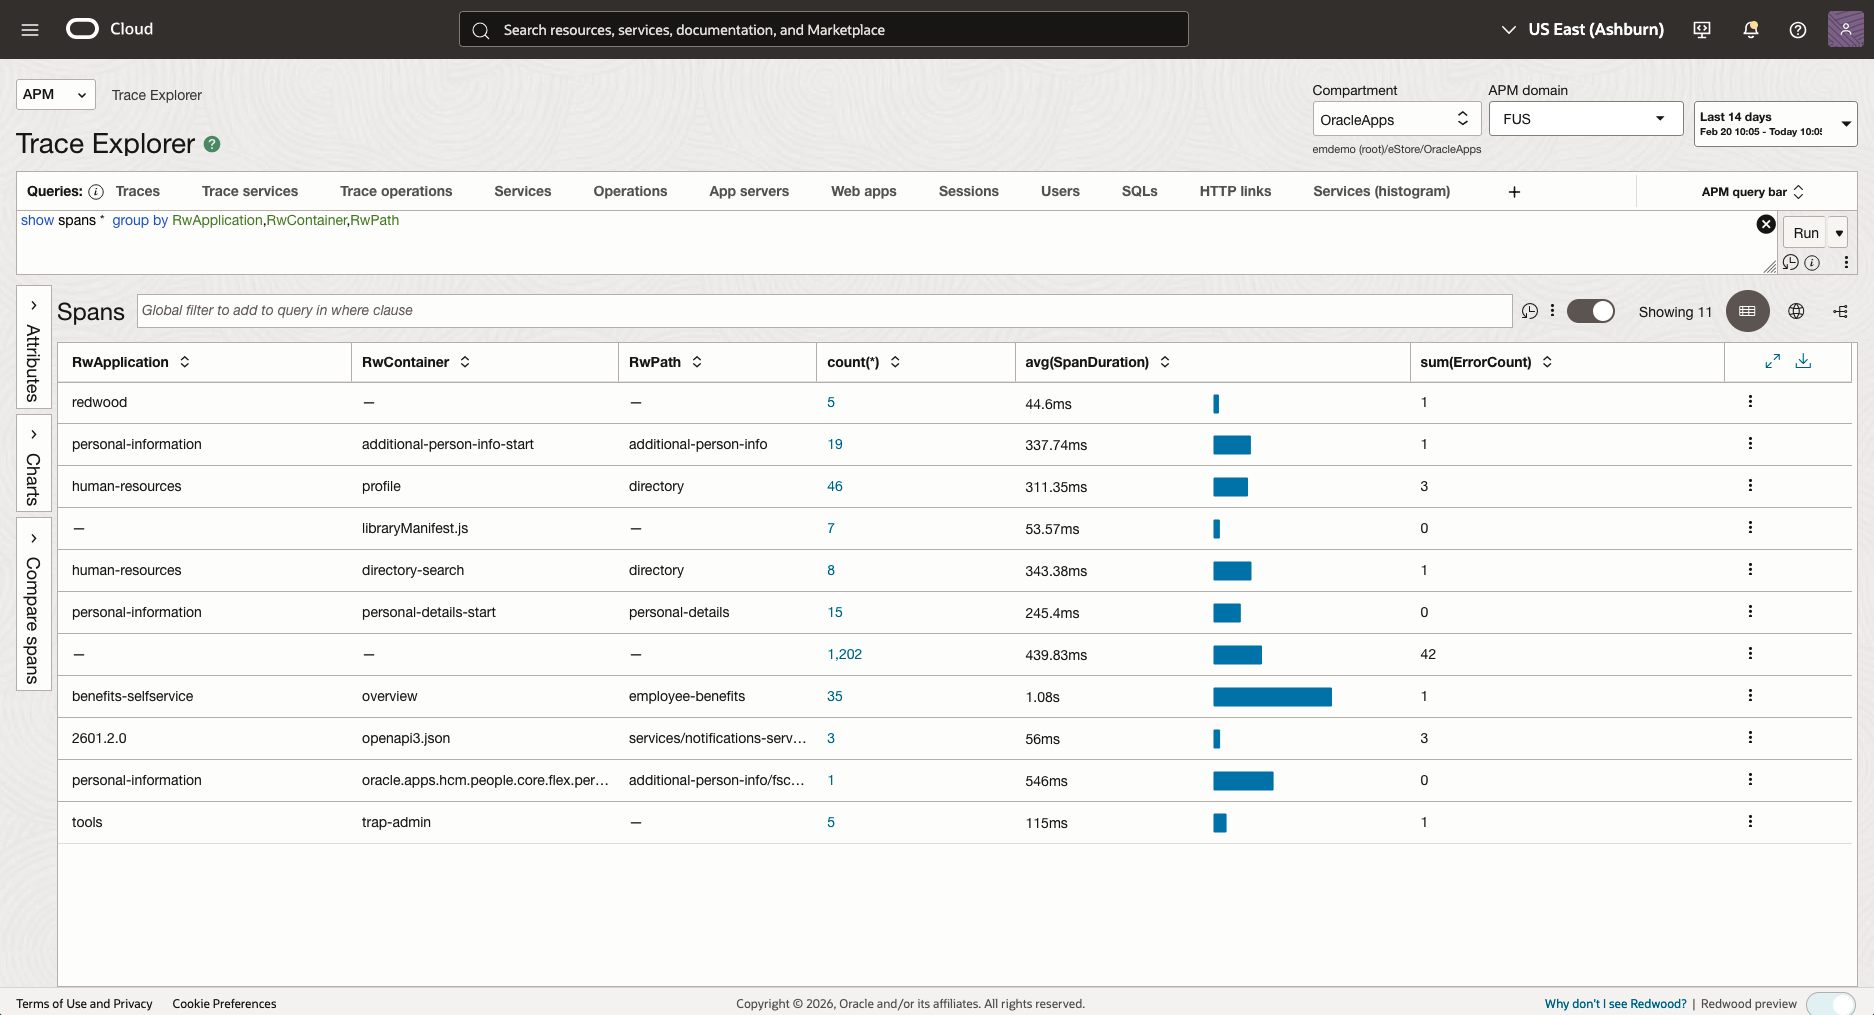 Figure 28: Redwood Pages Analysis
For ADF Pages:
show spans * group by FusFamily,FusProductCode,FusComponentType,FusContextRoot,FusRegionId
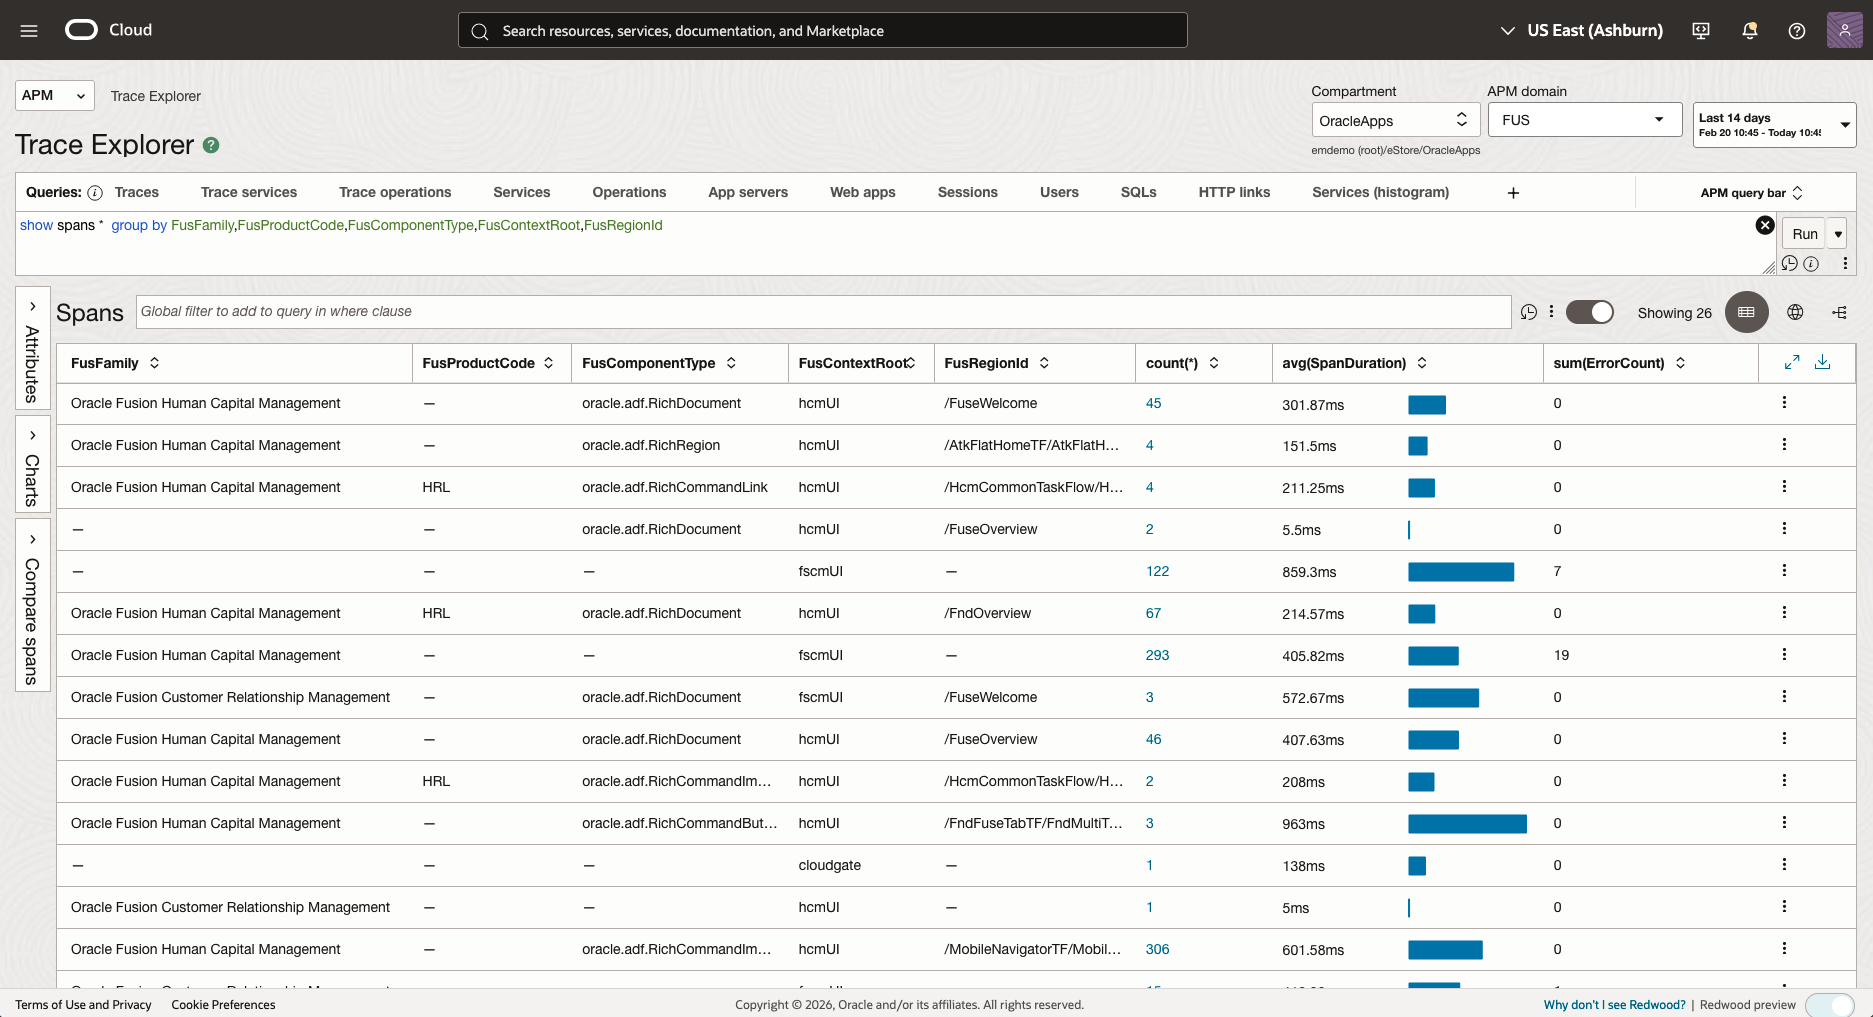 Figure 29: ADF Pages Analysis
Use Case 2: User Session Performance Profiling
Analyze the sequence of events and performance bottlenecks within individual user sessions.
show (traces) * where SessionId='<your_session_id>' order by TraceRootSpanStartTime asc
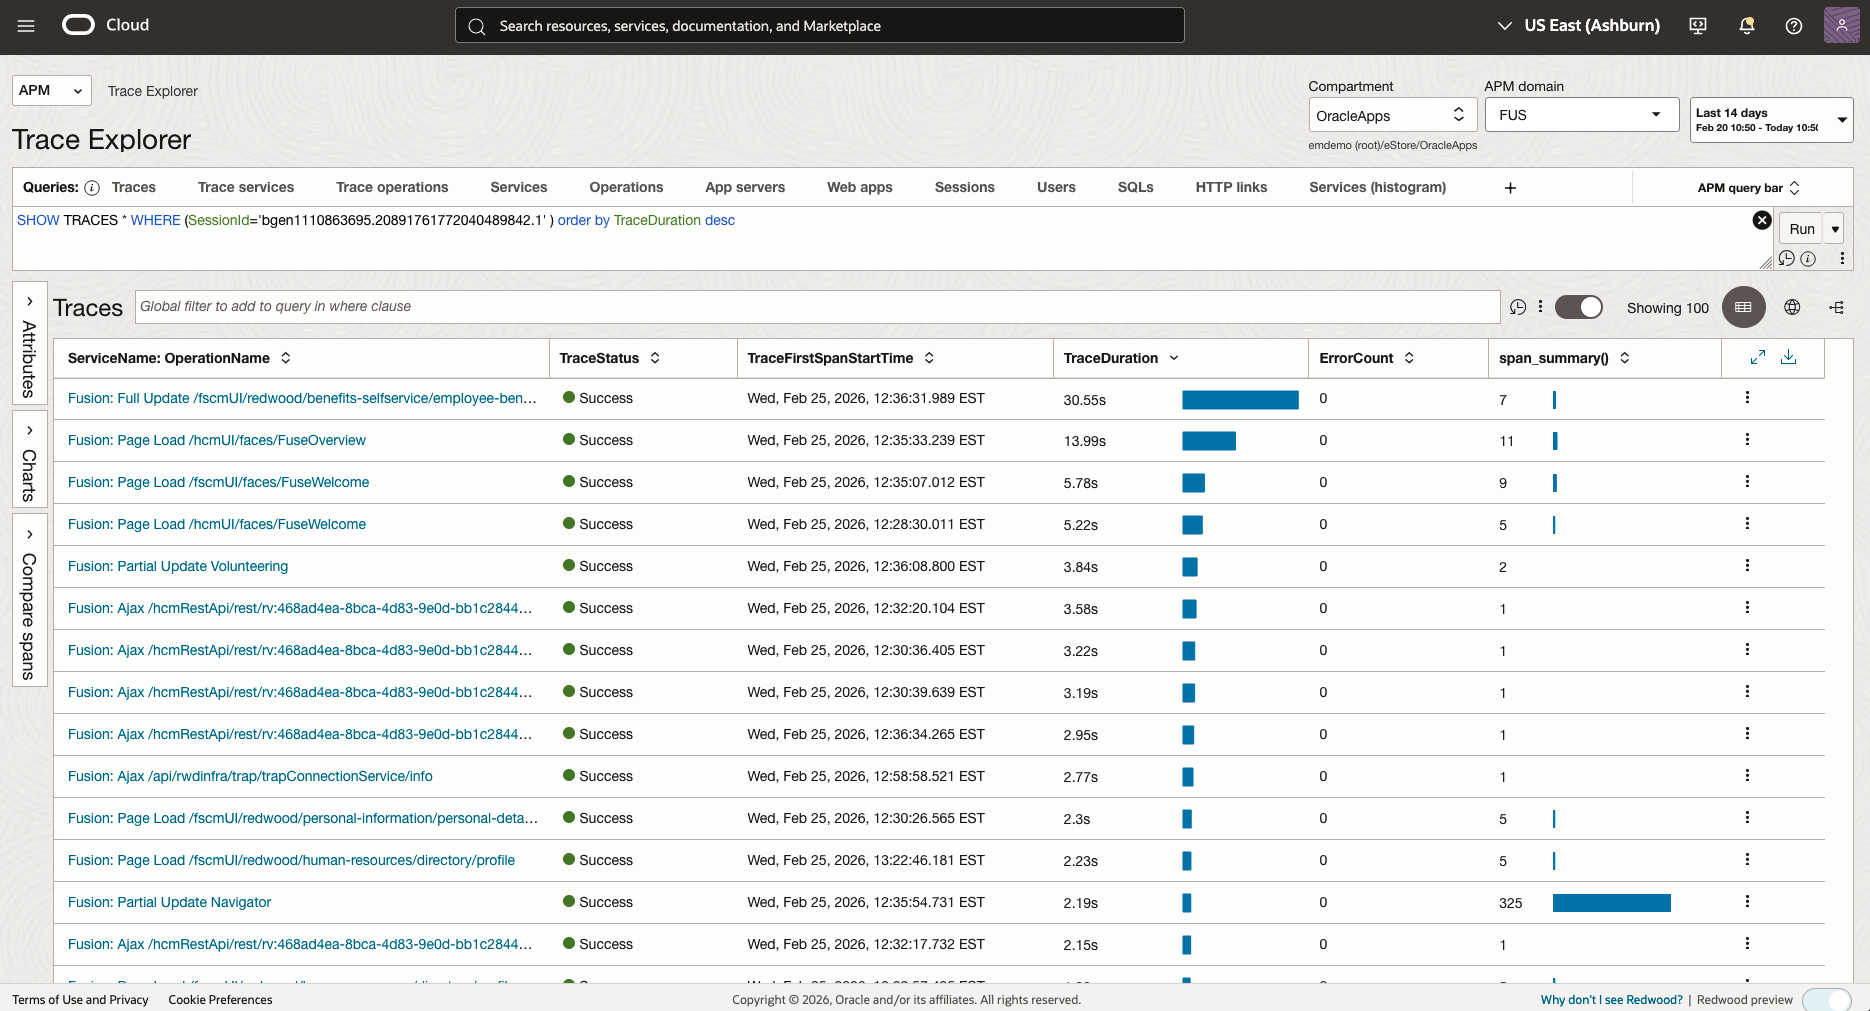 Figure 30: User Session Analysis
Use Case 3: Comprehensive Application Usage and Engagement
Analyze user engagement across both ADF modules and Redwood pages by aggregating the number of unique sessions, users, and total pageviews for each application area, ordered by highest session volume.
SHOW traces  FusFamily ||'-'|| FusProduct as "baseDetails",RwApplication ||'-'|| RwContainer ||'-'||RwPath as RedwoodDetails, count_distinct(sessionId) as sessions, count_distinct(username) as users, sum(pageviews) as activities
   where RwApplication is not omitted or FusFamily is not omitted
   group by FusFamily ||'-'|| FusProduct,RwApplication ||'-'|| RwContainer ||'-'||RwPath
order by count_distinct(sessionId) desc
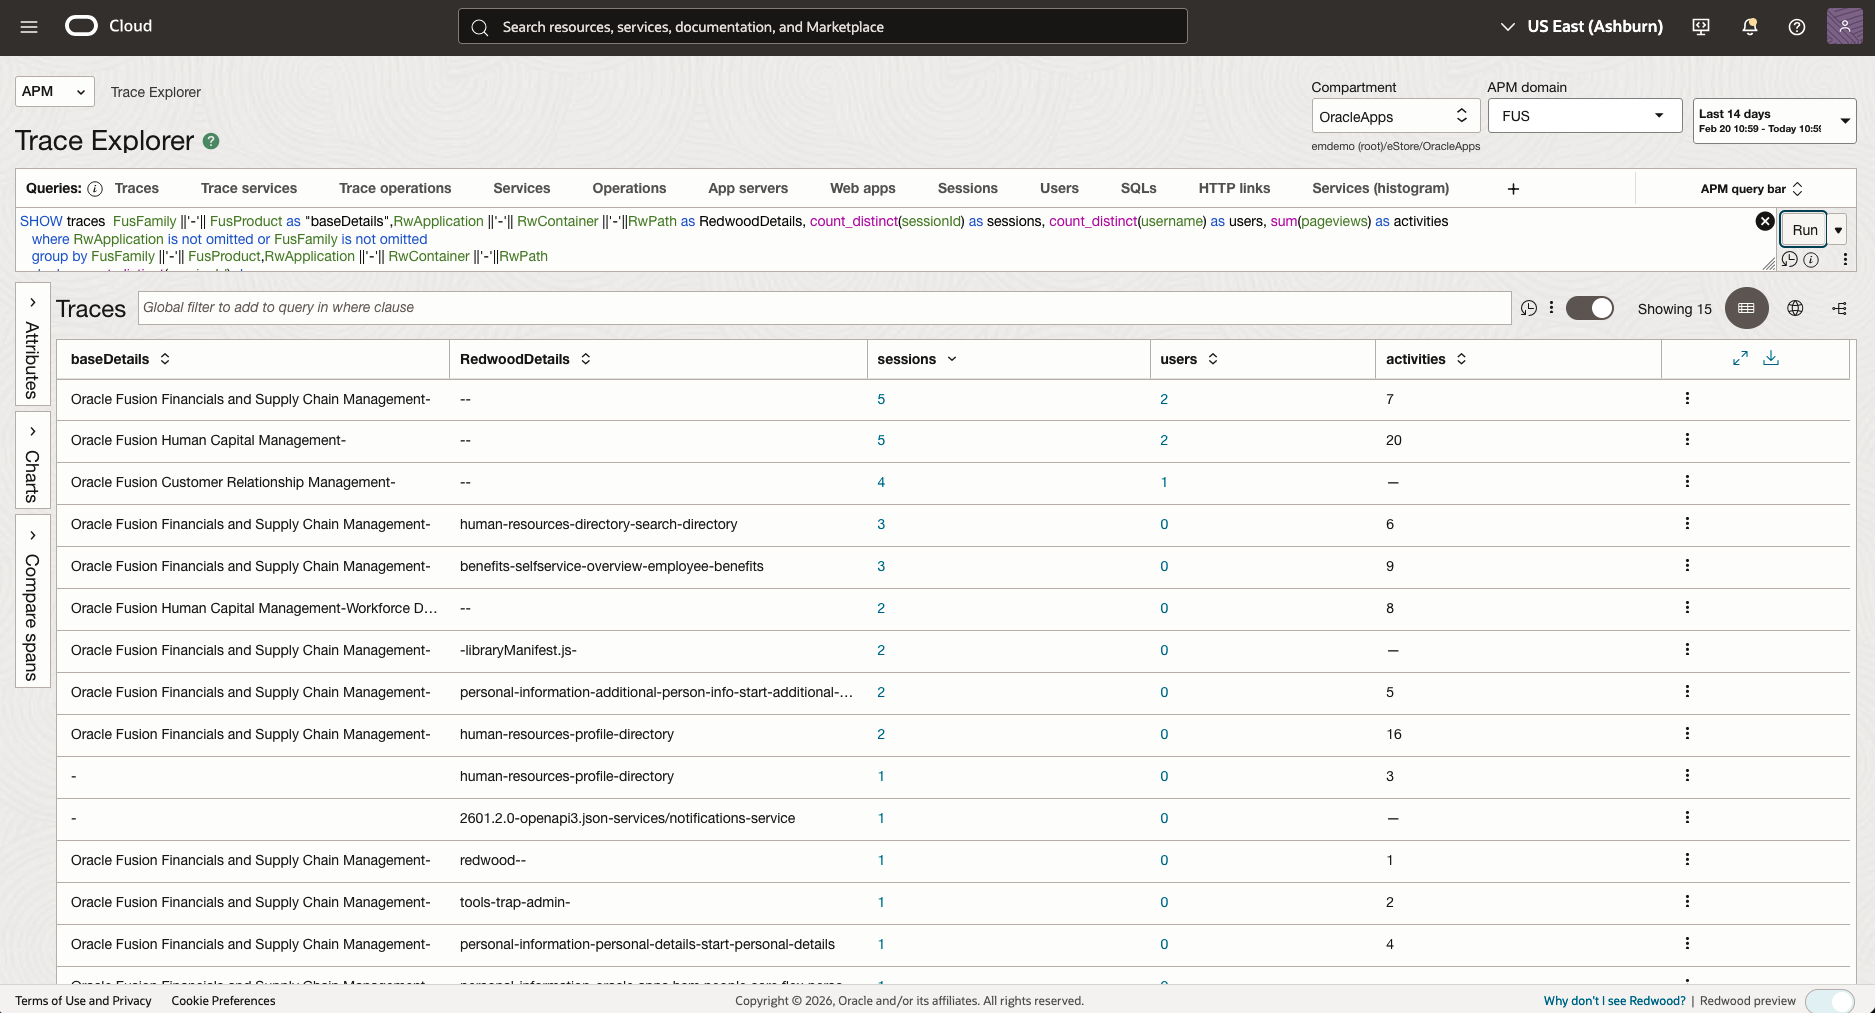 Figure 31: Application Usage Analysis
APM Custom Metrics and Alarms
Beyond passively monitoring dashboards, you can configure OCI APM to proactively alert you when Fusion web pages exceed acceptable performance thresholds. This involves creating a Custom Metric to aggregate performance data based on specific criteria, and then configuring OCI Alarms.
Step 1: Create a Custom Metric
First, define a custom metric to continuously capture specific performance behavior, such as slow page loads.
- Navigate to your APM Domain > Resources > Custom metrics.
- Click Create custom metric.
- Enter a Metric name (e.g.,
SlowFusionRedwoodPages). - In the Span filter box, configure the query to isolate the targeted behavior. For example:
ServiceName = 'Fusion' and WebApplication = 'RedwoodPage' -
From the Metric value source dropdown list, select the numeric metric to capture (e.g.,
SpanDuration).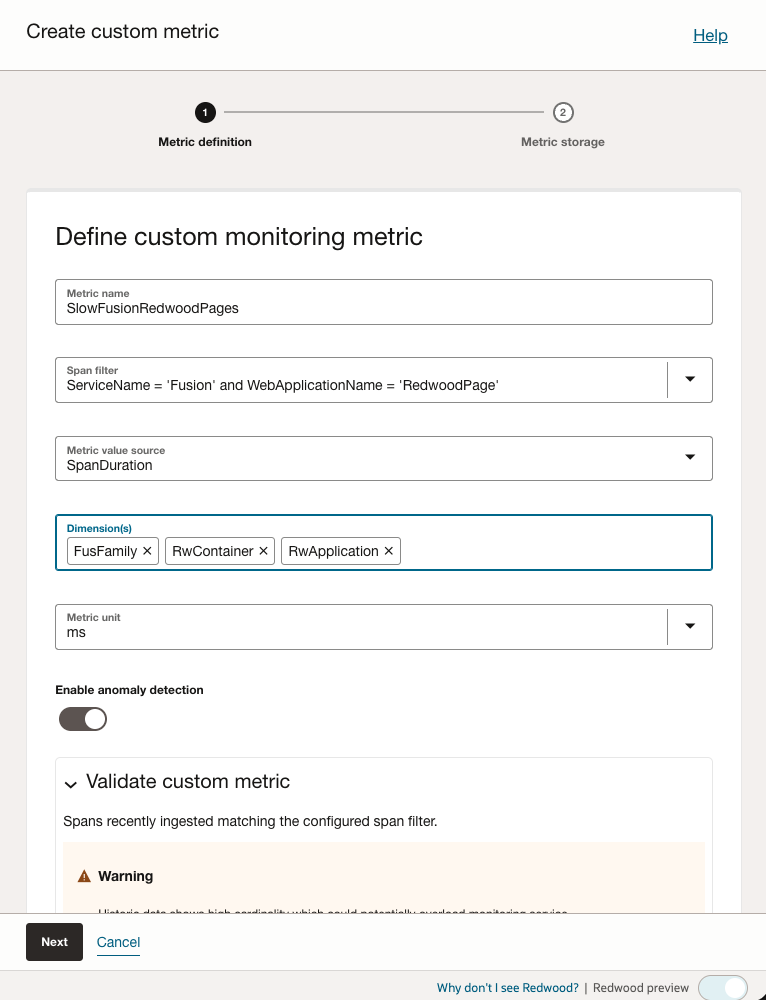 Figure 32: Custom Metric Value Source
 -
(Optional) Select one or multiple Dimensions for fine-grained grouping (e.g.,
RwContainer,RwApplication,FusFamily).Note: if you choose too many dimensions, the custom metric will be aggregated for each combination of dimensions, which may result in high cardinality which could potentially overload monitoring service. Please reduce the number of dimensions to avoid this issue.
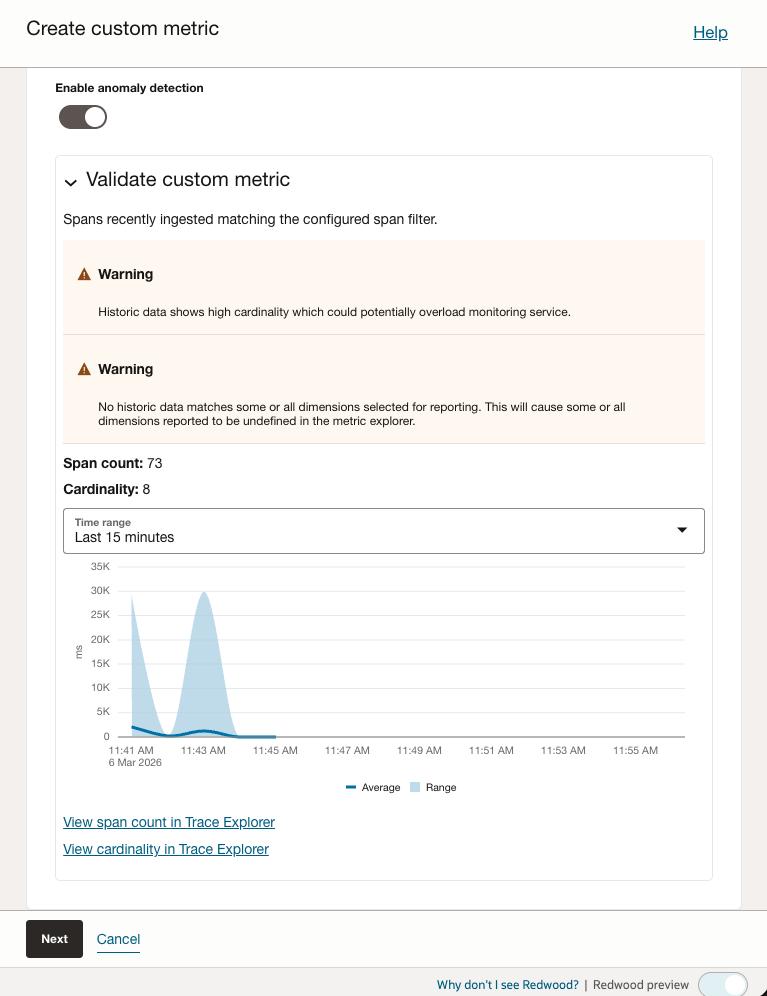 Figure 33: Custom Metric Large Volume Warning
 - Click Next to choose metric storage options.
- Choose your target Compartment and Namespace. The default namespace is
oracle_apm_custom(note: using a non-default custom namespace requires configuring OCI identity policies). -
Click Create. APM will now periodically aggregate and push this custom metric to the OCI Monitoring service.
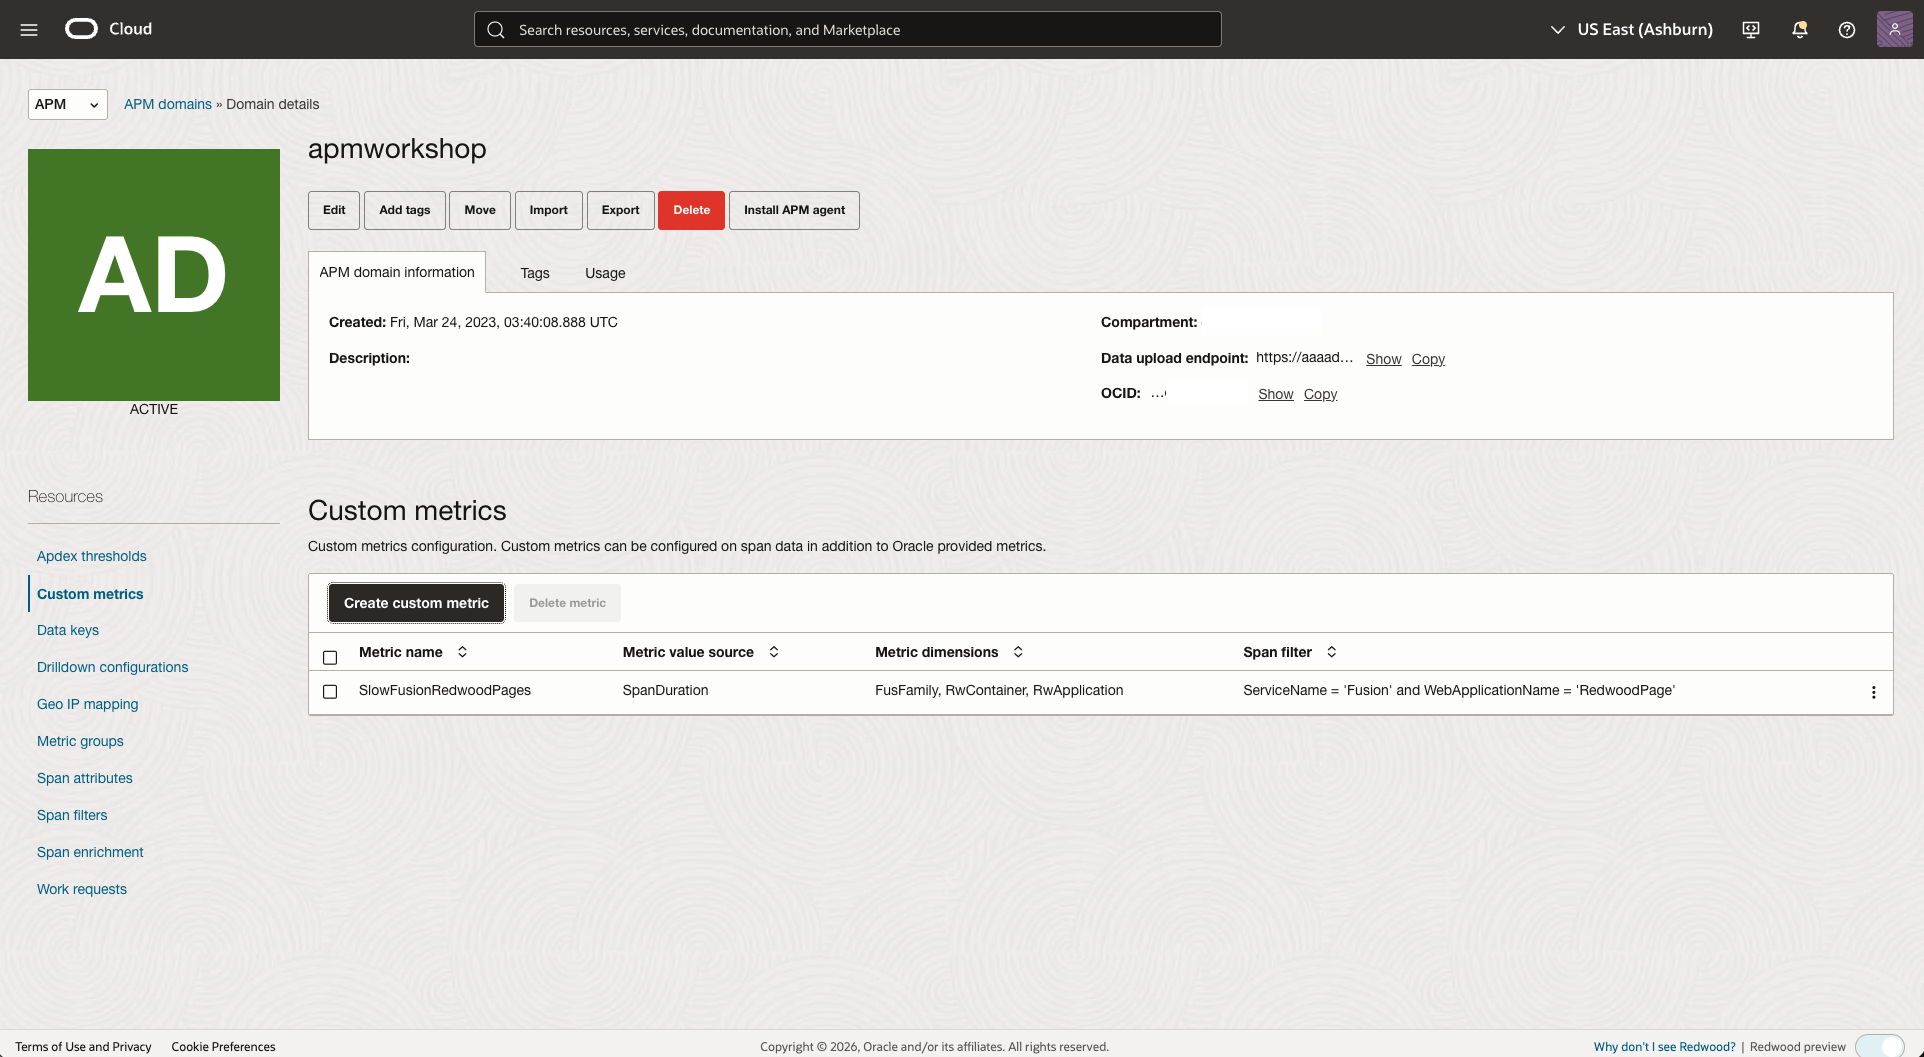 Figure 34: Custom Metric
Step 2: Configure an OCI Alarm
Finally, set up an alarm to notify your team when the custom metric breaches a threshold.
- In the Oracle Cloud Console, navigate to Observability & Management > Monitoring > Metrics Explorer.
- Select the compartment, metric namespace (
oracle_apm_custom) and the custom metric name (e.g.,SlowFusionRedwoodPages). - Click Create Alarm.
- Provide Alarm Name, Alarm Summary, Metric Namespace(e.g.,
oracle_apm_custom), Metric Name(e.g.,SlowFusionRedwoodPages), Interval(1 minute), Statistic(Mean). - Define the Trigger Rule (e.g., trigger when the count > 1000 within a 1-minute interval).
- Under Destinations, select or create an OCI Notification Topic (e.g., Email, Slack/PagerDuty integration) to route the alert to your support team.
- Click Save Alarm.
Your team will now receive automated alerts whenever Fusion page performance degrades beyond your specified thresholds!
Conclusion
Implementing OCI APM Real User Monitoring for Oracle Fusion SaaS Cloud Apps provides organizations with comprehensive visibility into real user experience, enabling data-driven performance optimization and improved user satisfaction. By deploying the APM Browser Agent for both ADF and Redwood pages, organizations can:
- Track User Behavior: Understand which pages users access and how they navigate through Fusion Apps
- Profile Performance: Analyze individual user sessions to identify performance bottlenecks
- Geographic Analysis: Understand how user location impacts application performance
- Standardized Metrics: Use Apdex scores to measure and track overall application performance
- Trend Analysis: Monitor performance over time to detect degradation and measure improvements
- Device Profiling: Optimize application performance for different devices, browsers, and connection types
The implementation uses an ADF page-template configuration for ADF pages and an assistant-generated Visual Builder workspace import for eligible Redwood App UIs. After the Fusion enrichment rule is enabled and the deployment is validated, the APM Browser Agent collects RUM data without requiring additional server-side agents.
By leveraging the insights provided by APM RUM, organizations can proactively identify and resolve performance issues, optimize user experience, and ensure that Fusion Cloud Apps deliver the performance and reliability that users expect.
References
- Real User Monitoring for Oracle Fusion SaaS Cloud Apps using OCI APM Browser Agent
- Observability and Management Solution: Oracle Fusion Applications and OCI Observability Services
- Configure APM Browser Agent for Real User Monitoring
- Deploy the APM Browser Agent With Your Application
- Configure Attributes for Real User Monitoring
- Configure Session Tracking
- Configure Ajax Calls Instrumentation
- Configure Span Rules
- Hide Personally Identifiable Information
- Verify APM Browser Agent Deployment
- Export Your Workspace as an Archive
- Import Resources to Your Workspace